
shopper/payment package handles payment processing through a driver-based architecture. It sits between your storefront and payment providers, giving you a single API to initiate, authorize, capture, and refund payments, regardless of which provider you use.
Every payment operation is recorded as a transaction, giving you a complete audit trail. The package automatically keeps your order’s payment status in sync as transactions succeed or fail.
How It Works
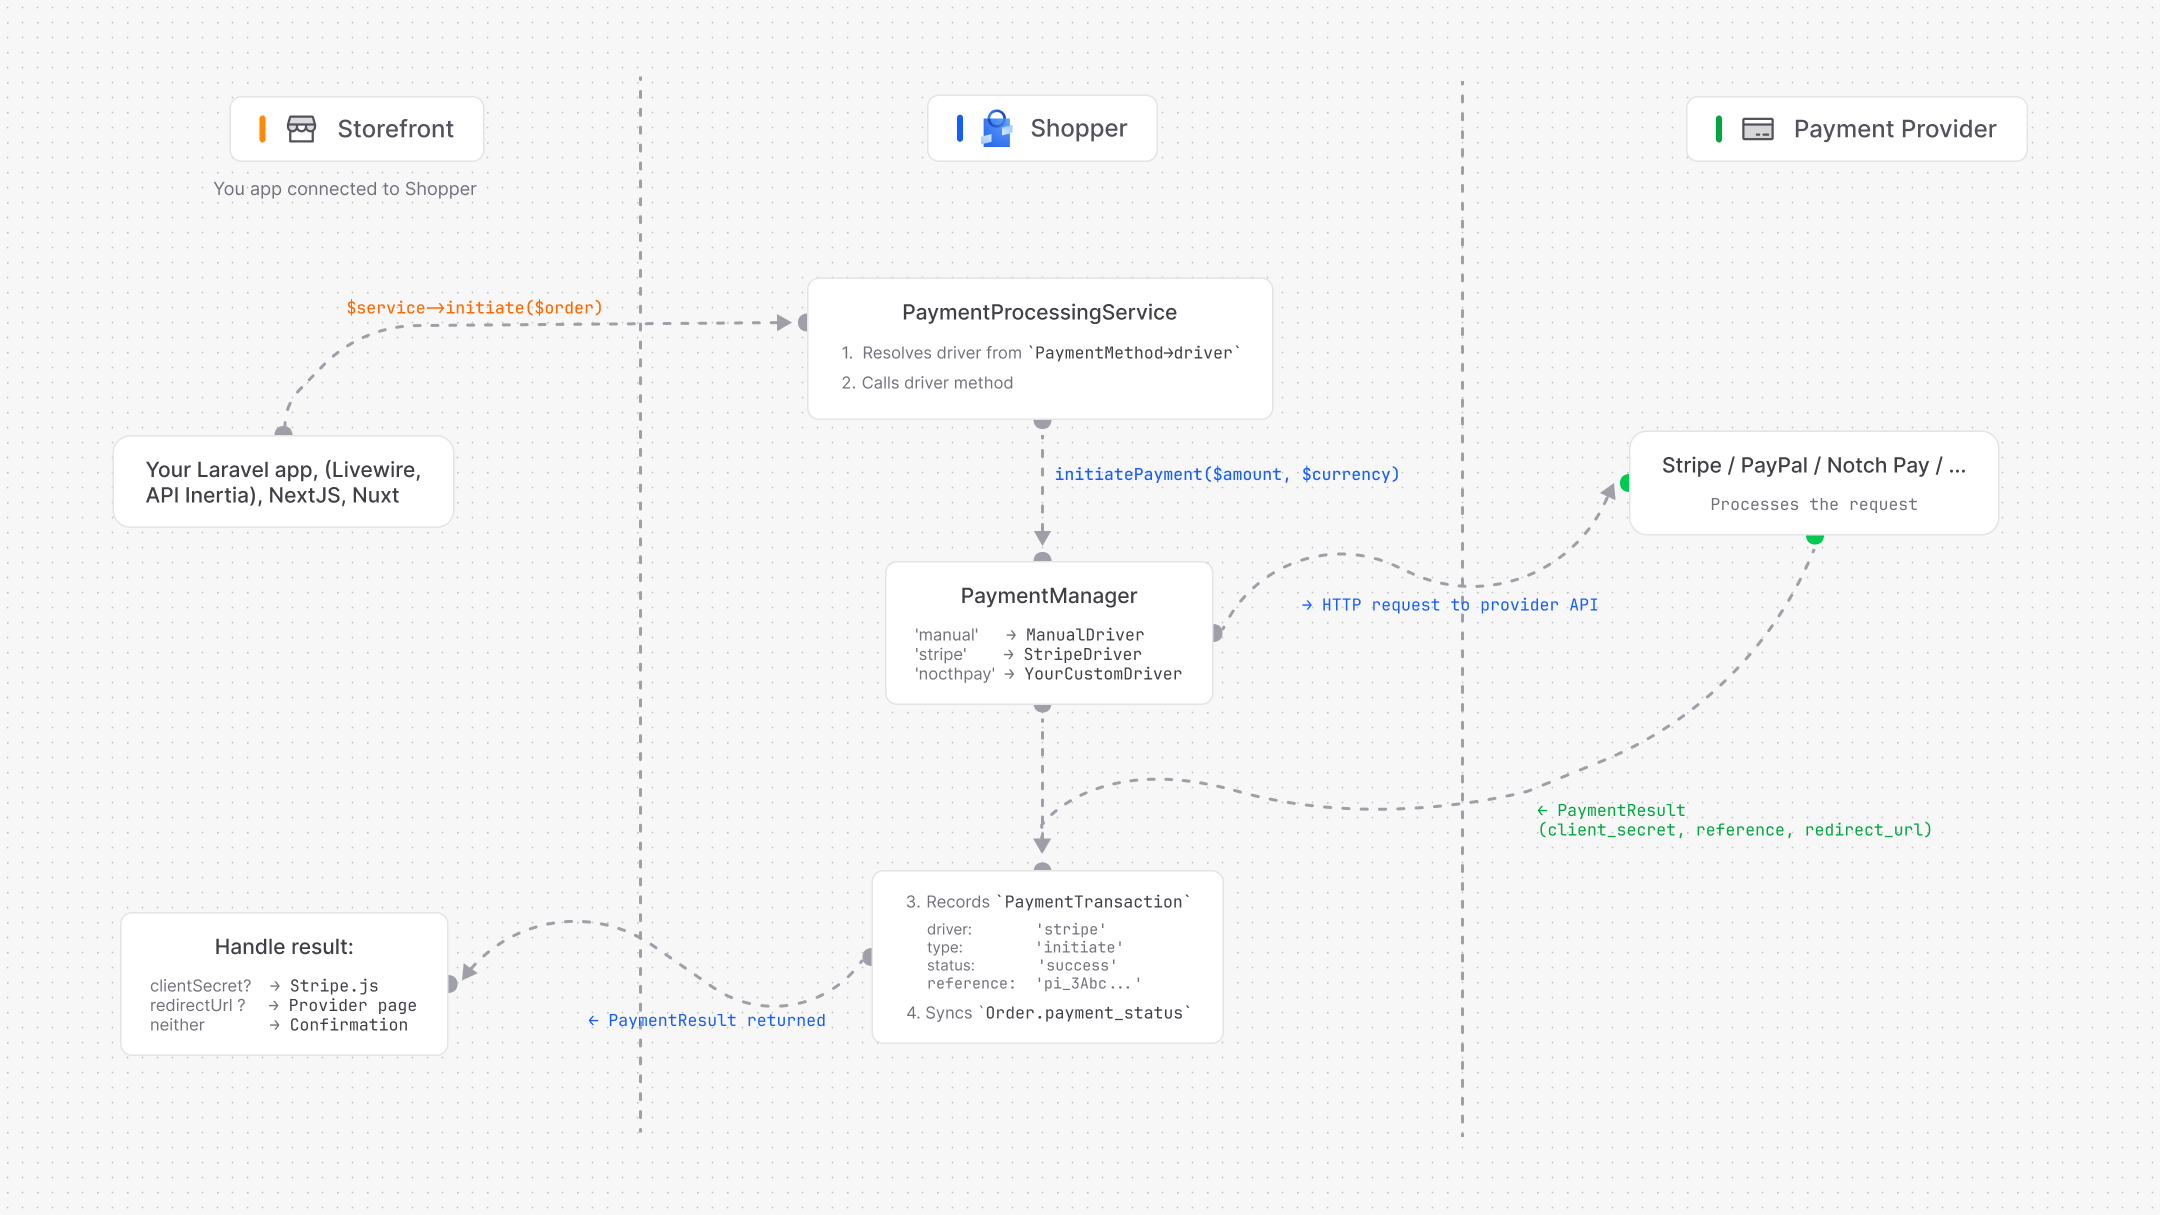
The payment system has four main pieces:- PaymentManager resolves payment drivers by name (
stripe,manual,paypal, etc.) - PaymentDriver is the contract every provider must implement
- PaymentProcessingService wraps driver calls with transaction recording and status sync
- PaymentTransaction stores every operation for audit and debugging
Payment Drivers
Available Drivers
Using the Facade
ThePayment facade gives you access to the driver manager:
The PaymentDriver Contract
Every driver implementsShopper\Payment\Contracts\PaymentDriver:
Shopper provides an abstract
Driver class with default implementations that throw PaymentException::notSupported(). Extend it and override only the methods your provider supports.
Processing Payments
ThePaymentProcessingService is the recommended way to process payments. It wraps every driver call with:
- Automatic transaction recording in the database
- Order payment status synchronization
- Consistent error handling
Initiating a Payment
This is the first step in any payment flow. It creates a payment session with the provider and records aninitiate transaction.
Here’s how the demo store initiates a payment at checkout:
PaymentResult tells you what to do next:
clientSecretis set. Redirect the customer to a page with the Stripe.js Payment ElementredirectUrlis set. Redirect the customer to the provider (PayPal, 3D Secure, etc.)- Neither. The payment completed immediately (manual driver, for example)
Authorizing a Payment
Confirms a previously initiated payment. On success, the order’spayment_status is updated to Authorized.
Capturing a Payment
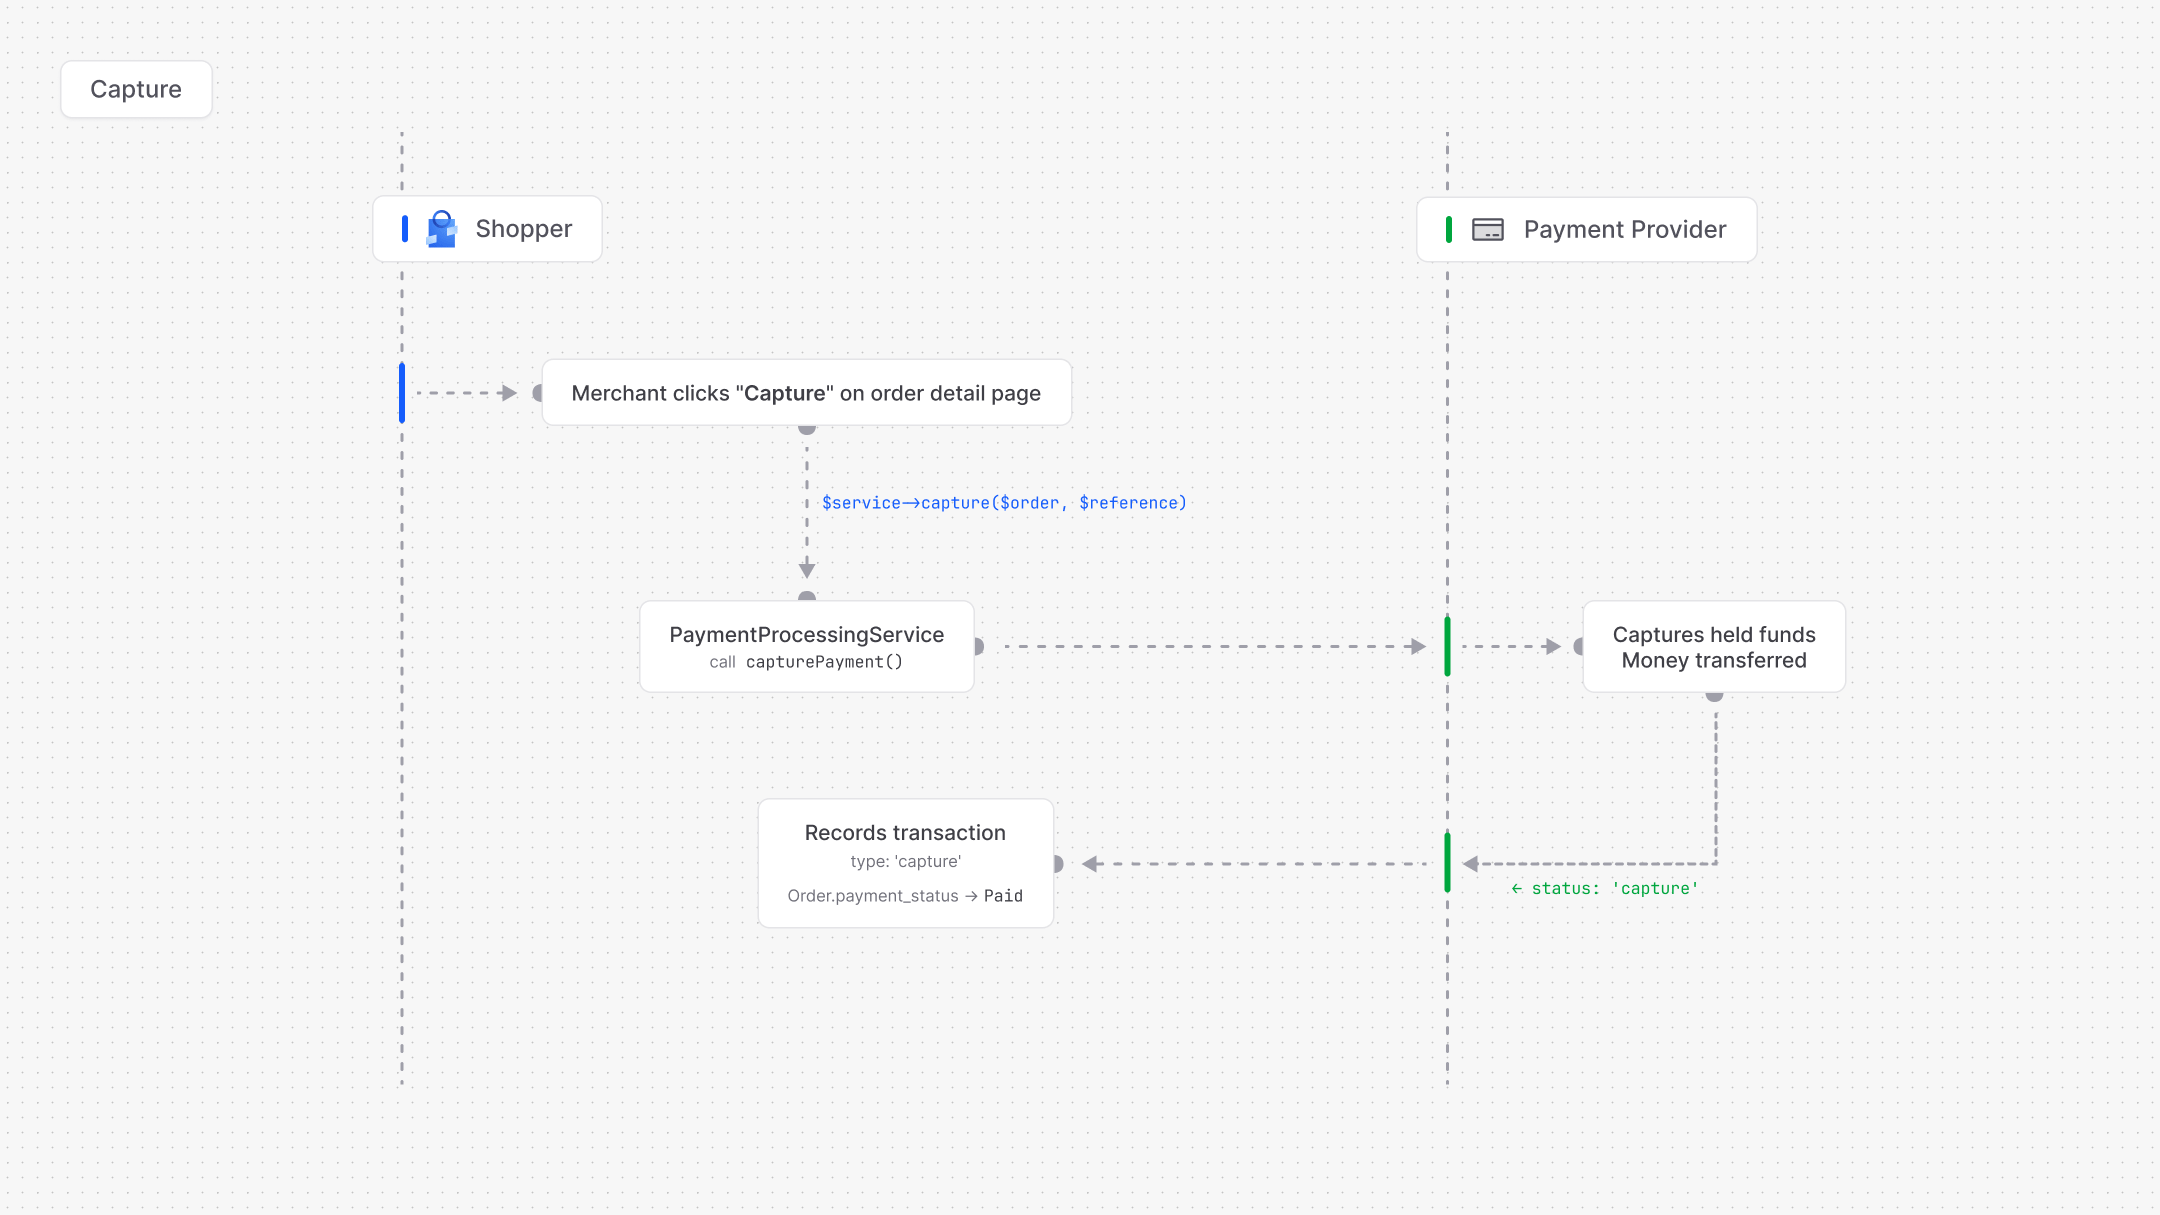
Captures an authorized payment. This is when funds are actually collected from the customer. On success, the order’spayment_status is updated to Paid.
Refunding a Payment
Refunds a captured payment. The service automatically determines whether the order becomesPartiallyRefunded or Refunded by comparing the total refunded amount against the order total.
Cancelling a Payment
Cancels a payment that hasn’t been captured yet. On success, the order’spayment_status is updated to Voided. No funds are collected.
Querying Transactions
Getting Available Payment Methods for a Zone
The service filters payment methods by zone and only returns methods whose driver is properly configured:Data Transfer Objects
PaymentResult
Every driver operation returns aPaymentResult. This is an immutable object that carries the outcome of the operation.
WebhookResult
Webhook handlers return aWebhookResult that tells you what happened on the provider side:
Payment Status
ThePaymentStatus enum on the Order model tracks the overall payment state. It is updated automatically by the PaymentProcessingService as transactions succeed.
Status Transitions
Transaction Model
Every payment operation is recorded as aPaymentTransaction:
Database Schema
Enums
Querying Transactions
paymentTransactions relationship is registered automatically when the payment package is installed.
Capture Methods
Shopper supports two capture strategies. This determines when the customer’s funds are actually collected.Manual Capture (Authorize-then-Capture)
Recommended for physical goods. Funds are held on the customer’s card at checkout but only collected when you decide to capture.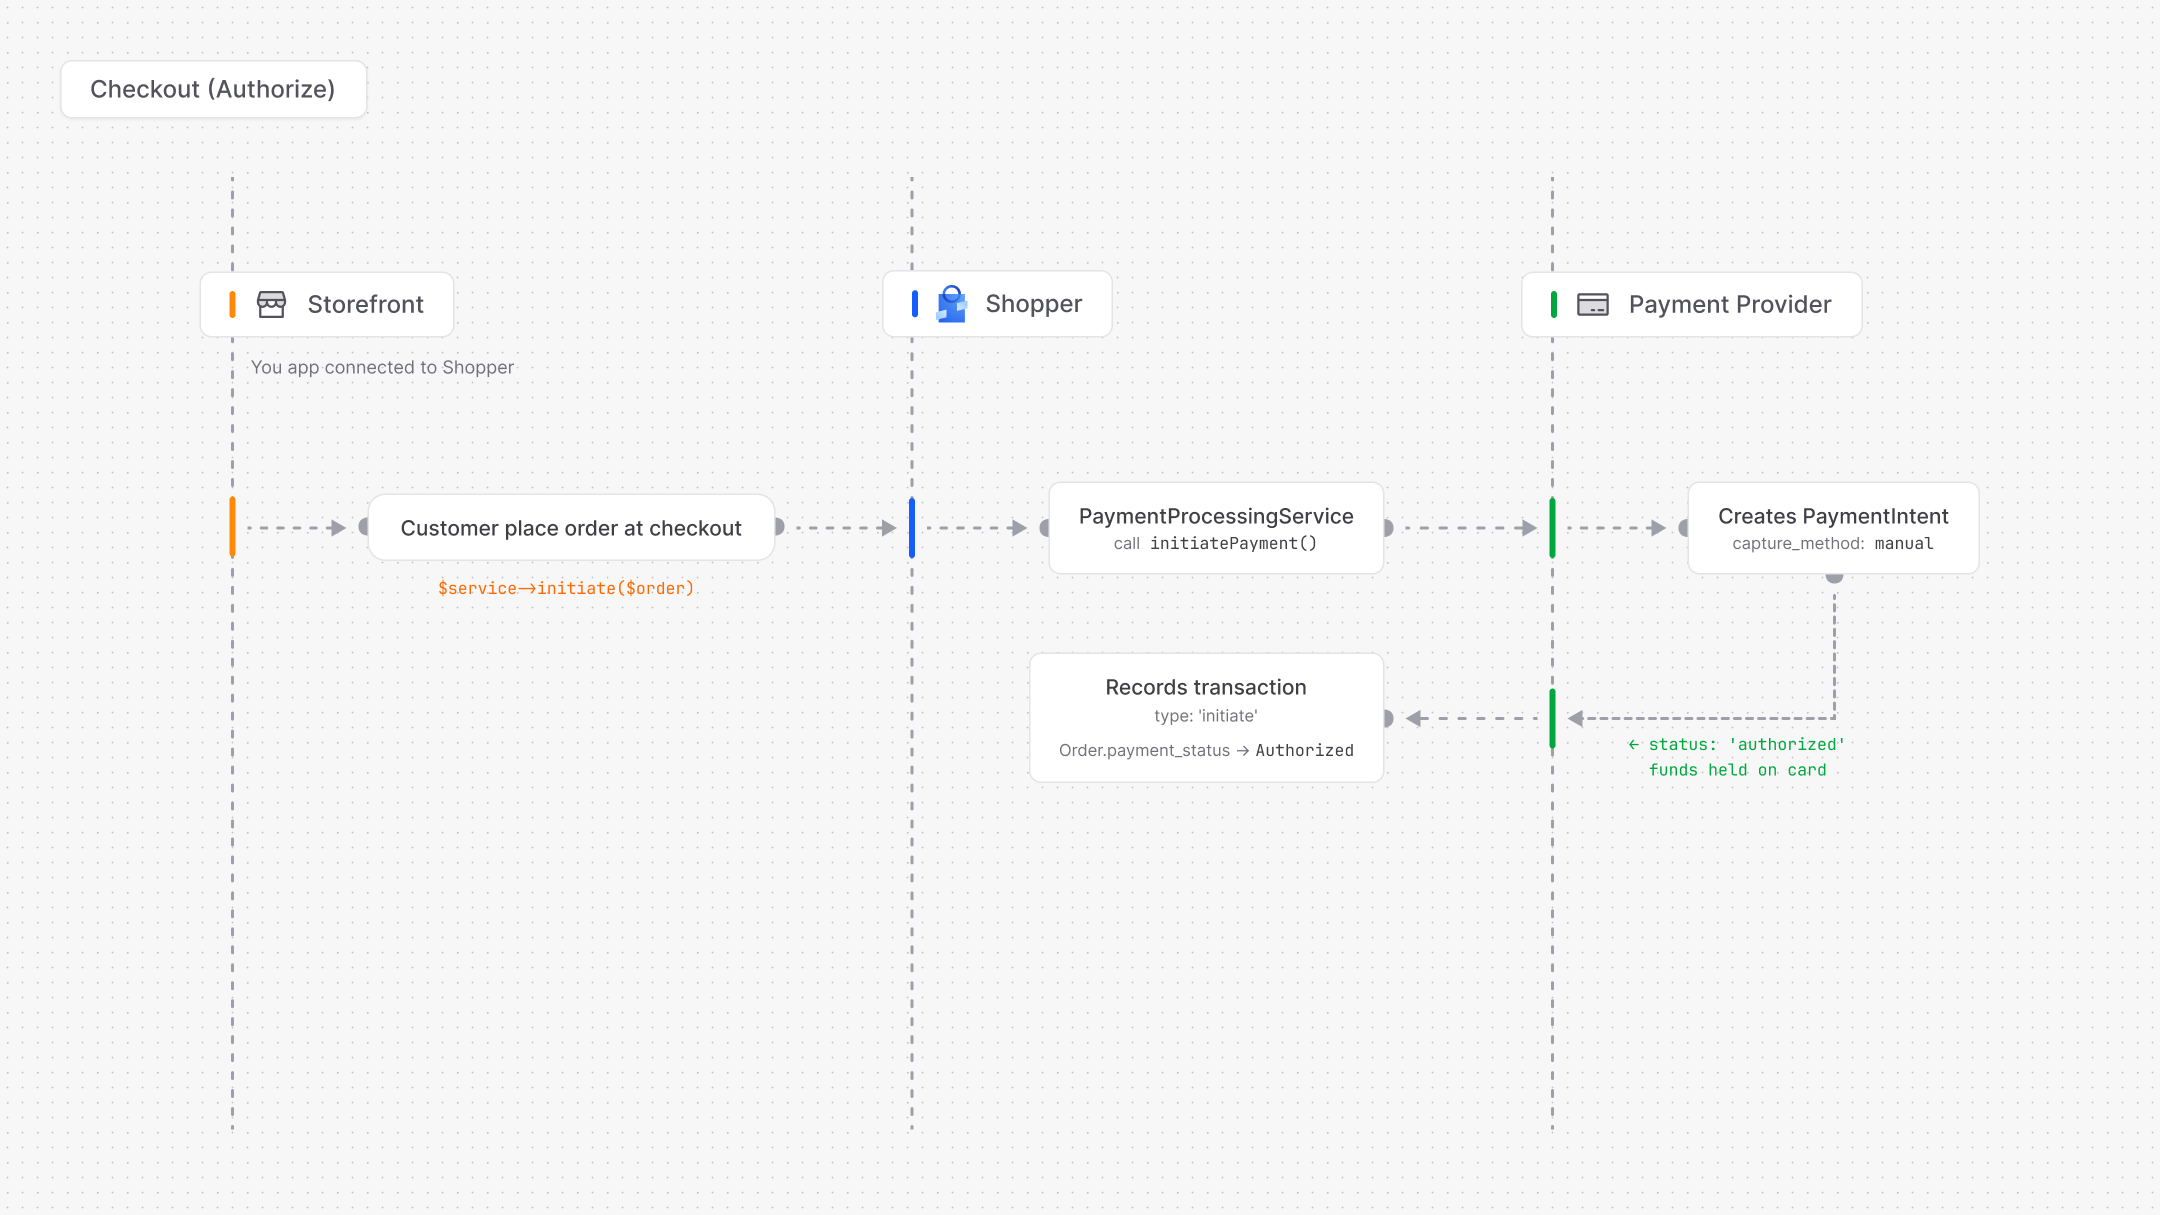
- Verify stock availability before collecting payment
- Cancel an order without processing a refund (and without refund fees)
- Capture only when the order is ready to ship
Automatic Capture
Funds are collected immediately when the customer confirms payment. Use this for digital products, subscriptions, or when fulfillment is instant.Manual capture is the default for the Stripe driver. Authorization holds typically last 7 days (varies by card network), so you must capture within that window or the hold is released automatically.
Custom Drivers
You can create drivers for any payment provider: PayPal, Mollie, Razorpay, NotchPay, etc.Step 1: Create the Driver Class
Extend the abstractDriver class and implement the methods your provider supports:
Step 2: Register the Driver
In a service provider, usePayment::extend() to register your driver. The closure is called lazily, only when the driver is first accessed.
Step 3: Add Configuration
Add the driver credentials toconfig/shopper/payment.php:
.env:
Step 4: Create the Payment Method
Link the driver to a payment method record. This is what makes it selectable at checkout:driver column connects this payment method to your registered driver. When a customer selects “PayPal” at checkout and the PaymentProcessingService processes the order, it resolves the paypal driver and calls initiatePayment().
Payment Method Model
TheShopper\Core\Models\PaymentMethod model represents a payment option available at checkout. Each method is linked to a driver (Stripe, manual, PayPal, etc.) and can be scoped to specific zones.
The model uses the
HasSlug trait and the HasZones trait for zone-based availability: