> ## Documentation Index
> Fetch the complete documentation index at: https://docs.laravelshopper.dev/llms.txt
> Use this file to discover all available pages before exploring further.
# Managing Orders
> View, process, and fulfill customer orders from your admin panel.
When a customer places an order on your store, it appears in the **Orders** section of your admin panel. From here, you manage everything: confirm payment, prepare shipments, track delivery, and handle issues.
## Order List
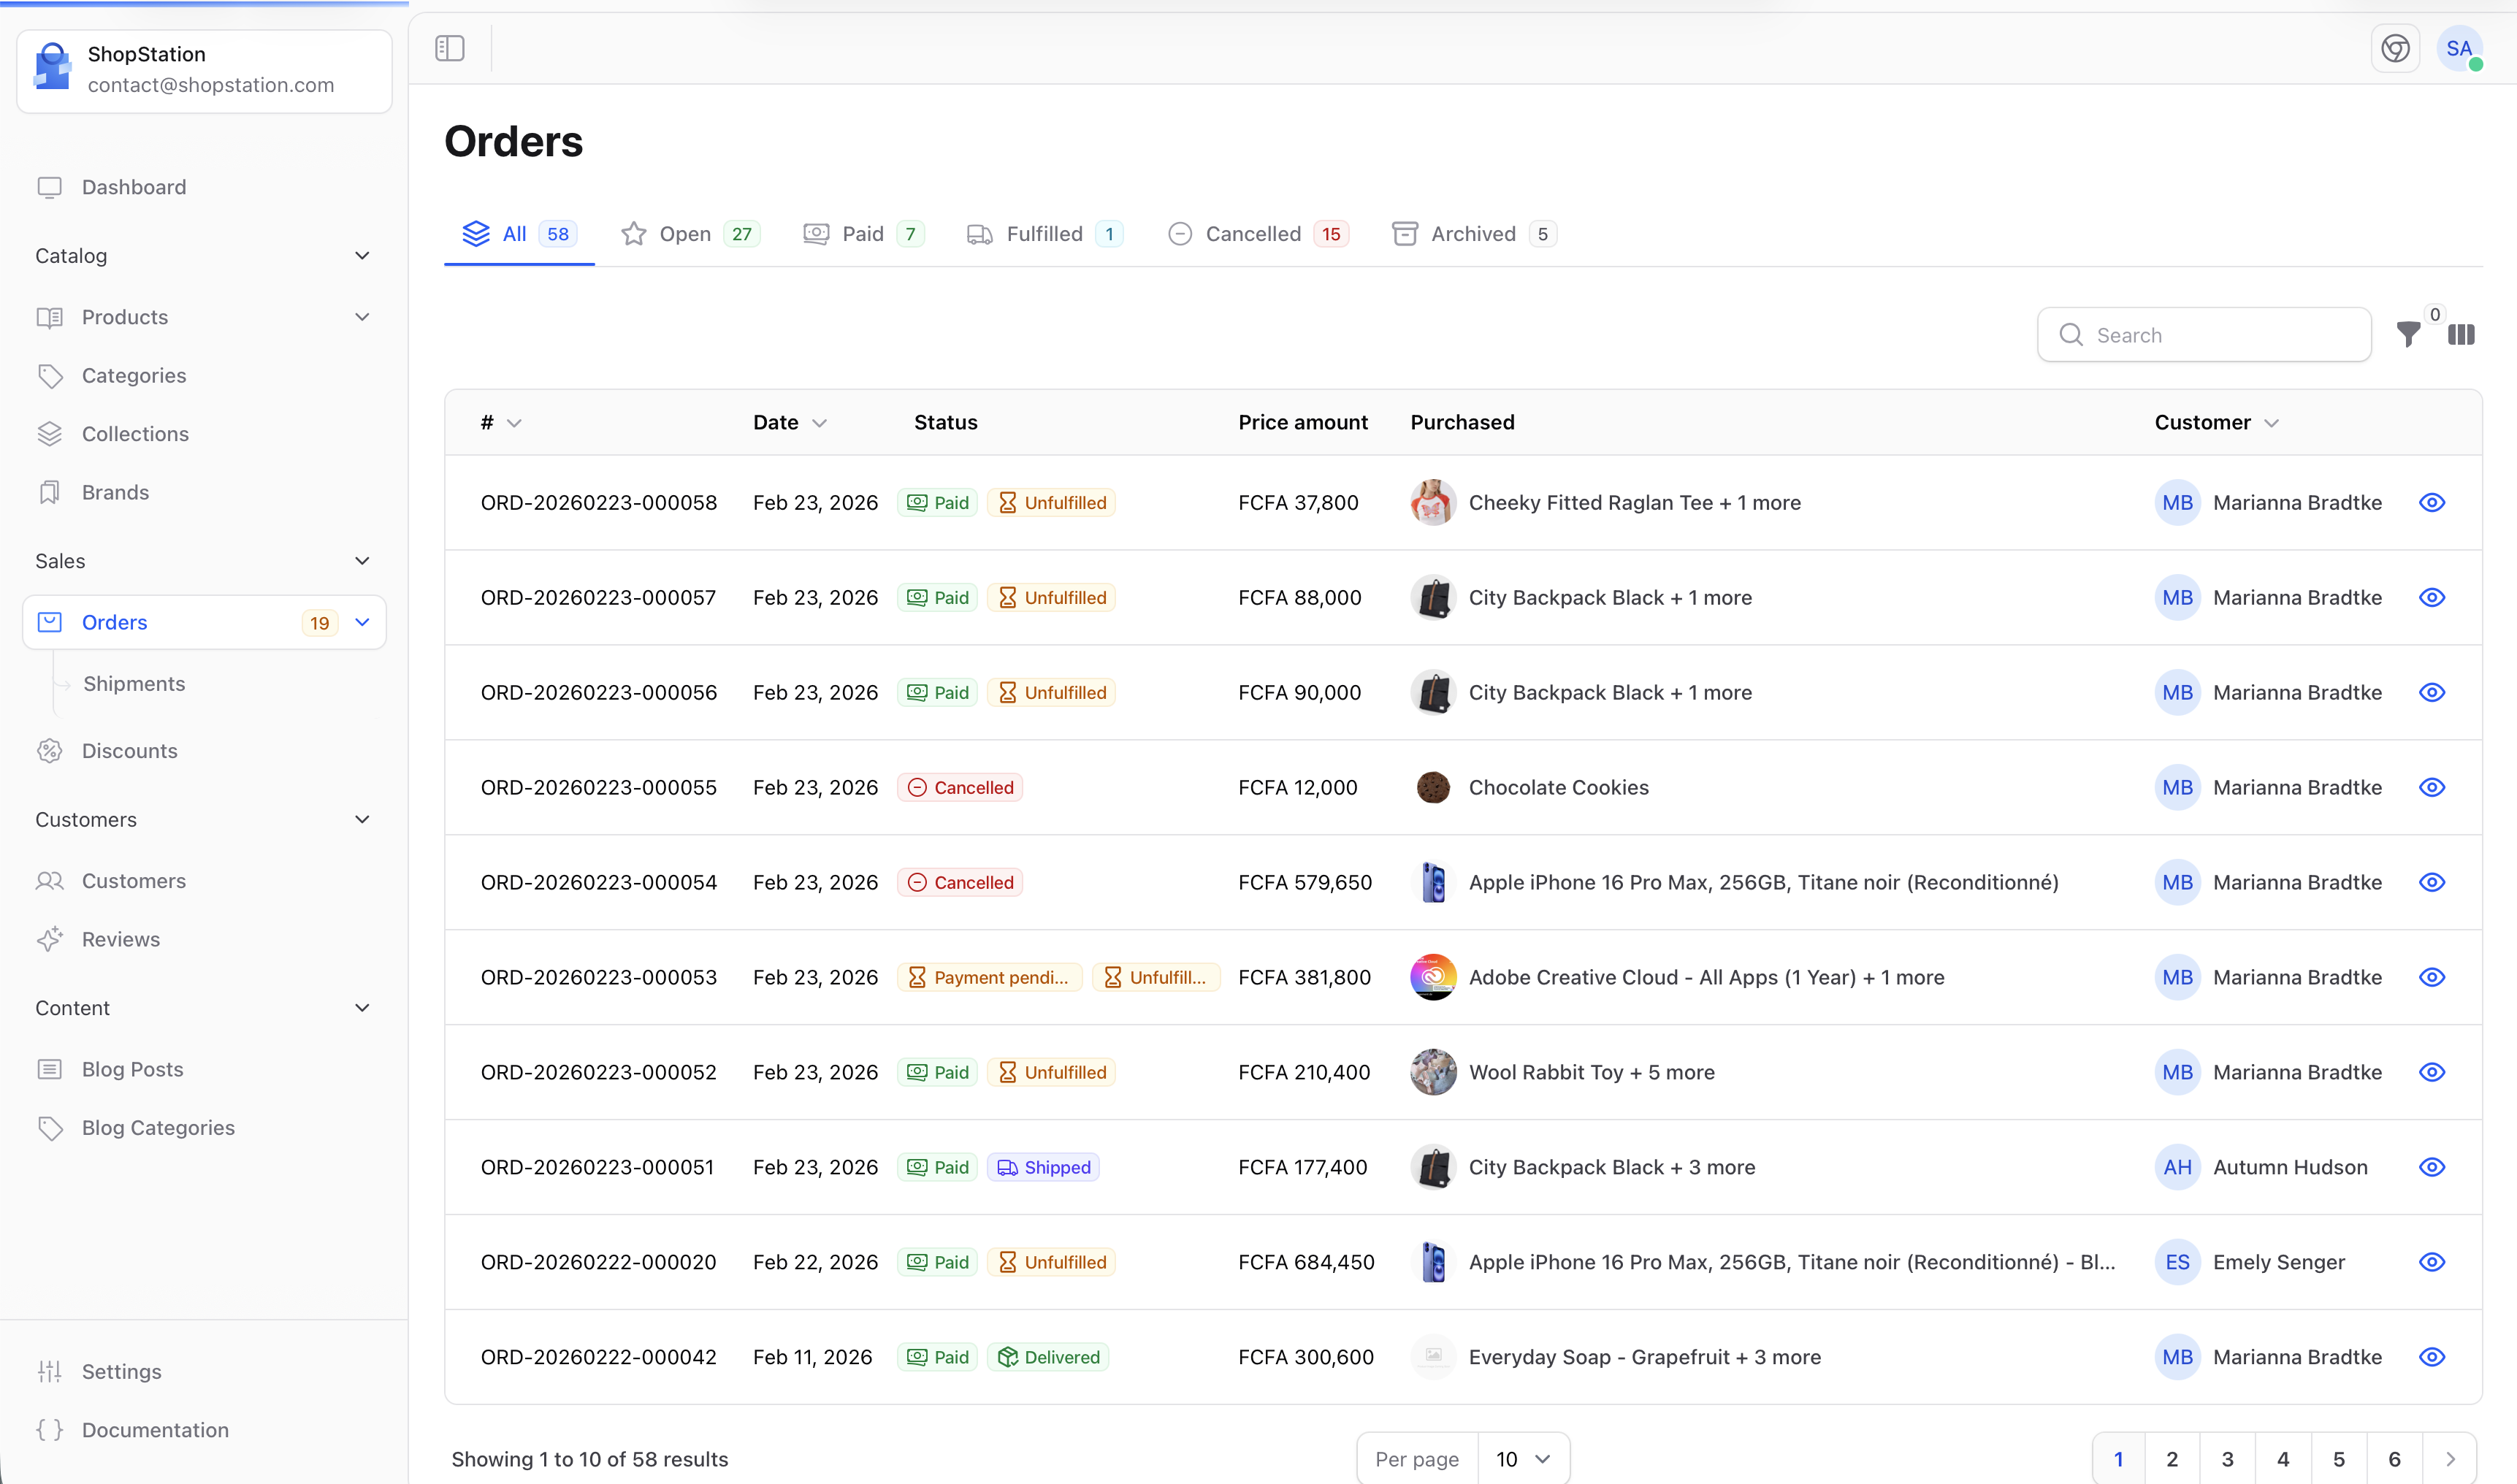
Click **Orders** in the sidebar to see all your orders. The list shows each order's number, date, total amount, and three status badges that tell you where the order stands at a glance.
 ### Tabs
The tabs at the top filter orders by their current state:
| Tab | What it shows |
| ------------- | --------------------------------------------------- |
| **All** | Every order in your store |
| **Open** | New and processing orders that still need attention |
| **Paid** | Orders where payment has been received |
| **Fulfilled** | Orders that have been shipped or partially shipped |
| **Cancelled** | Orders that were cancelled |
| **Archived** | Orders you've archived |
### Filters
Click the filter icon to narrow down your list. You can filter by order number, customer, order status, payment status, shipping status, date range, zone, channel, or currency.
## Order Detail
Click on any order to open its detail page. The page is split into two areas: the main content on the left and customer information on the right.
### Tabs
The tabs at the top filter orders by their current state:
| Tab | What it shows |
| ------------- | --------------------------------------------------- |
| **All** | Every order in your store |
| **Open** | New and processing orders that still need attention |
| **Paid** | Orders where payment has been received |
| **Fulfilled** | Orders that have been shipped or partially shipped |
| **Cancelled** | Orders that were cancelled |
| **Archived** | Orders you've archived |
### Filters
Click the filter icon to narrow down your list. You can filter by order number, customer, order status, payment status, shipping status, date range, zone, channel, or currency.
## Order Detail
Click on any order to open its detail page. The page is split into two areas: the main content on the left and customer information on the right.
 ### Header
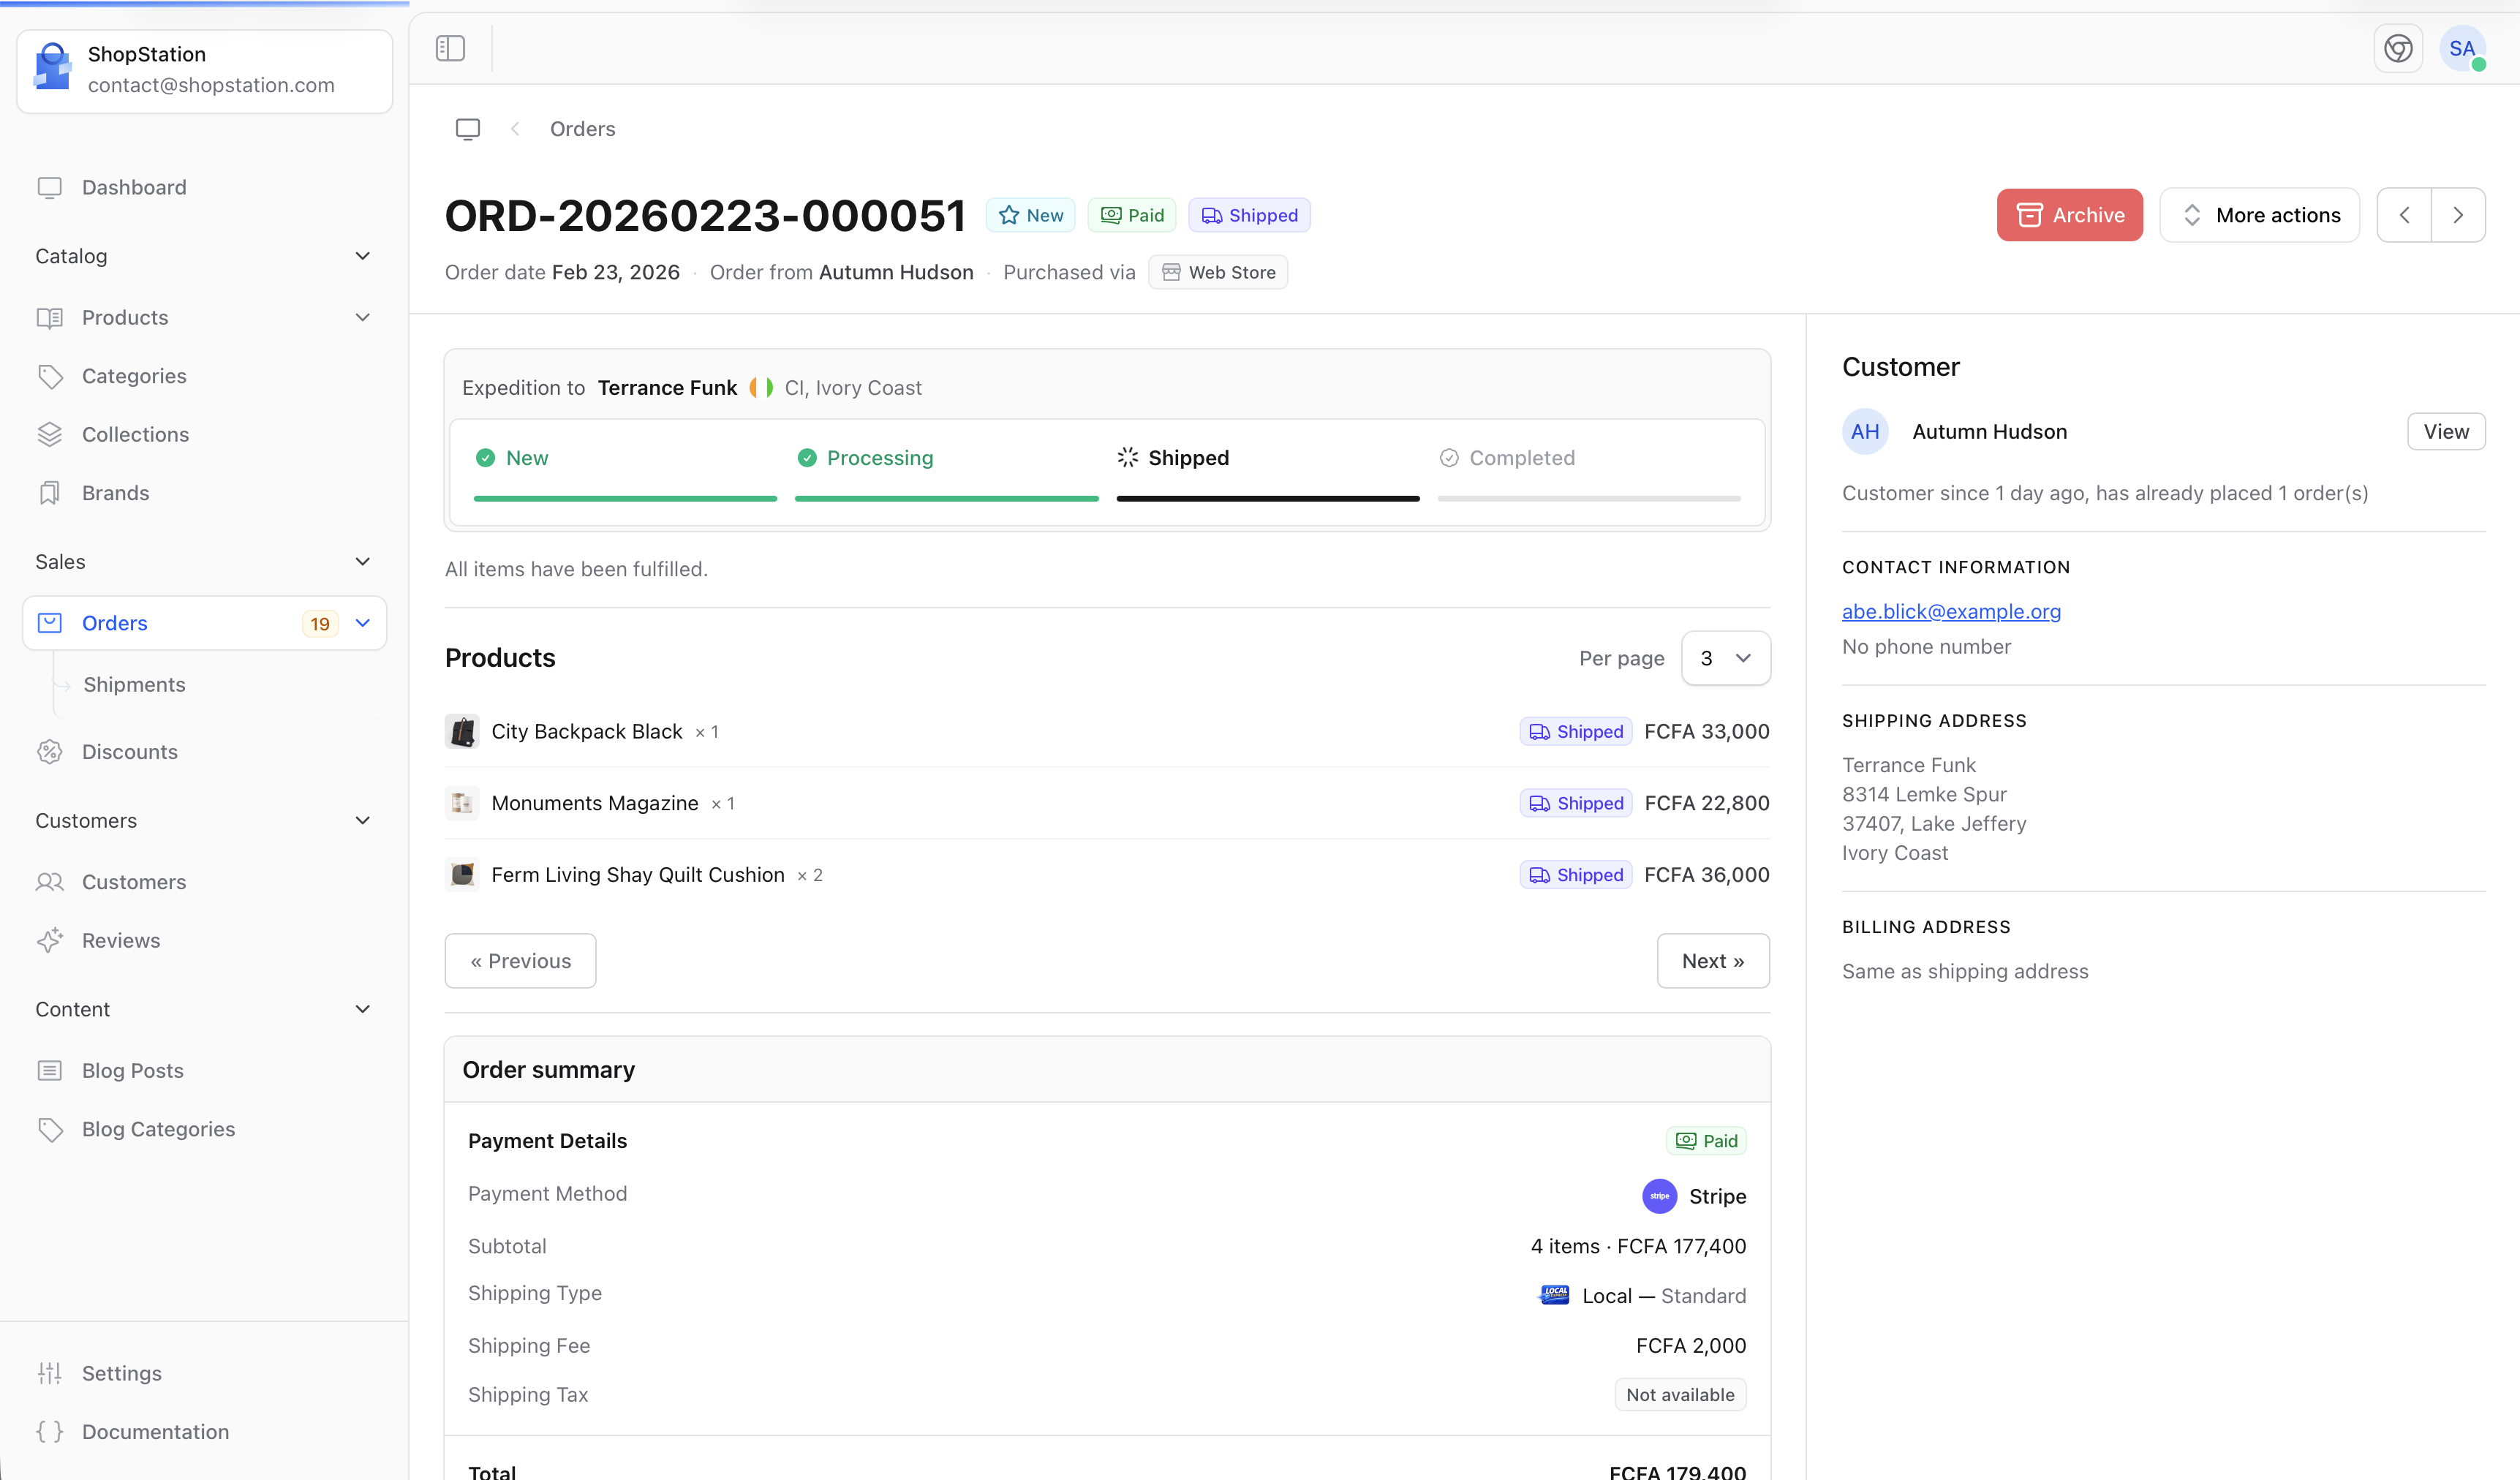
The header stays visible as you scroll. It shows:
* The **order number**
* Three **status badges** for order status, payment status, and shipping status
* **Action buttons** for processing the order (see [Actions](#actions) below)
* **Previous / Next** arrows to navigate between orders
* The **order date**, **customer name** (linked to their profile), and **sales channel**
### Main Content
The left side of the page contains three sections:
**Fulfillment**. A visual progress bar showing where the order is in the fulfillment process (New → Processing → Shipped → Completed). If there are items that haven't been assigned to a shipment yet, a **Create Shipping Label** button appears here.
**Products**. The list of items in the order with their thumbnail, name, quantity, fulfillment status badge, and price.
**Summary**. Payment status, payment method, subtotal, shipping carrier and fee, and the order total.
### Sidebar
The right side shows:
* **Customer profile**. Name, avatar, and a link to their full profile. Below that, how long they've been a customer and how many orders they've placed.
* **Contact information**. Email and phone number.
* **Shipping address**. The delivery address for this order.
* **Billing address**. Displayed separately, or "Same address" if it matches the shipping address.
* **Private notes**. A text field where you can leave internal comments. Only your team can see these.
## Order Status
Every order has three independent statuses that track different aspects of the order.
### Order Status
The overall state of the order.
| Status | Color | Meaning |
| -------------- | ------ | --------------------------------------------- |
| **New** | Blue | Order just came in, hasn't been looked at yet |
| **Processing** | Purple | You're actively working on this order |
| **Completed** | Teal | Everything is done, paid and delivered |
| **Cancelled** | Red | Order was cancelled |
| **Archived** | Gray | Order removed from active list |
### Payment Status
Tracks whether you've received the money.
| Status | Color | Meaning |
| ---------------------- | ------ | ----------------------------------------------------------- |
| **Payment pending** | Yellow | Waiting for payment |
| **Authorized** | Blue | Funds are held on the customer's card but not yet collected |
| **Paid** | Green | Payment received |
| **Partially refunded** | Orange | Some of the amount has been refunded |
| **Refunded** | Gray | Full amount refunded |
| **Voided** | Red | Payment was cancelled before any money was collected |
**Authorized** means the payment provider confirmed the customer has funds, but you haven't captured (collected) them yet. This is common for physical goods where you want to verify stock before charging.
### Shipping Status
Tracks where the physical goods are.
| Status | Color | Meaning |
| ----------------------- | ------ | ---------------------------------------------- |
| **Unfulfilled** | Yellow | No items have been shipped yet |
| **Partially shipped** | Blue | Some items shipped, others are still waiting |
| **Shipped** | Indigo | All items have been shipped |
| **Partially delivered** | Purple | Some packages arrived, others still in transit |
| **Delivered** | Green | Everything has been delivered |
| **Partially returned** | Orange | Some items were returned |
| **Returned** | Gray | All items were returned |
## Actions
The actions available depend on the current state of the order. They appear in the header, some as standalone buttons, others in the **More actions** dropdown.
### Capture Payment
### Header
The header stays visible as you scroll. It shows:
* The **order number**
* Three **status badges** for order status, payment status, and shipping status
* **Action buttons** for processing the order (see [Actions](#actions) below)
* **Previous / Next** arrows to navigate between orders
* The **order date**, **customer name** (linked to their profile), and **sales channel**
### Main Content
The left side of the page contains three sections:
**Fulfillment**. A visual progress bar showing where the order is in the fulfillment process (New → Processing → Shipped → Completed). If there are items that haven't been assigned to a shipment yet, a **Create Shipping Label** button appears here.
**Products**. The list of items in the order with their thumbnail, name, quantity, fulfillment status badge, and price.
**Summary**. Payment status, payment method, subtotal, shipping carrier and fee, and the order total.
### Sidebar
The right side shows:
* **Customer profile**. Name, avatar, and a link to their full profile. Below that, how long they've been a customer and how many orders they've placed.
* **Contact information**. Email and phone number.
* **Shipping address**. The delivery address for this order.
* **Billing address**. Displayed separately, or "Same address" if it matches the shipping address.
* **Private notes**. A text field where you can leave internal comments. Only your team can see these.
## Order Status
Every order has three independent statuses that track different aspects of the order.
### Order Status
The overall state of the order.
| Status | Color | Meaning |
| -------------- | ------ | --------------------------------------------- |
| **New** | Blue | Order just came in, hasn't been looked at yet |
| **Processing** | Purple | You're actively working on this order |
| **Completed** | Teal | Everything is done, paid and delivered |
| **Cancelled** | Red | Order was cancelled |
| **Archived** | Gray | Order removed from active list |
### Payment Status
Tracks whether you've received the money.
| Status | Color | Meaning |
| ---------------------- | ------ | ----------------------------------------------------------- |
| **Payment pending** | Yellow | Waiting for payment |
| **Authorized** | Blue | Funds are held on the customer's card but not yet collected |
| **Paid** | Green | Payment received |
| **Partially refunded** | Orange | Some of the amount has been refunded |
| **Refunded** | Gray | Full amount refunded |
| **Voided** | Red | Payment was cancelled before any money was collected |
**Authorized** means the payment provider confirmed the customer has funds, but you haven't captured (collected) them yet. This is common for physical goods where you want to verify stock before charging.
### Shipping Status
Tracks where the physical goods are.
| Status | Color | Meaning |
| ----------------------- | ------ | ---------------------------------------------- |
| **Unfulfilled** | Yellow | No items have been shipped yet |
| **Partially shipped** | Blue | Some items shipped, others are still waiting |
| **Shipped** | Indigo | All items have been shipped |
| **Partially delivered** | Purple | Some packages arrived, others still in transit |
| **Delivered** | Green | Everything has been delivered |
| **Partially returned** | Orange | Some items were returned |
| **Returned** | Gray | All items were returned |
## Actions
The actions available depend on the current state of the order. They appear in the header, some as standalone buttons, others in the **More actions** dropdown.
### Capture Payment
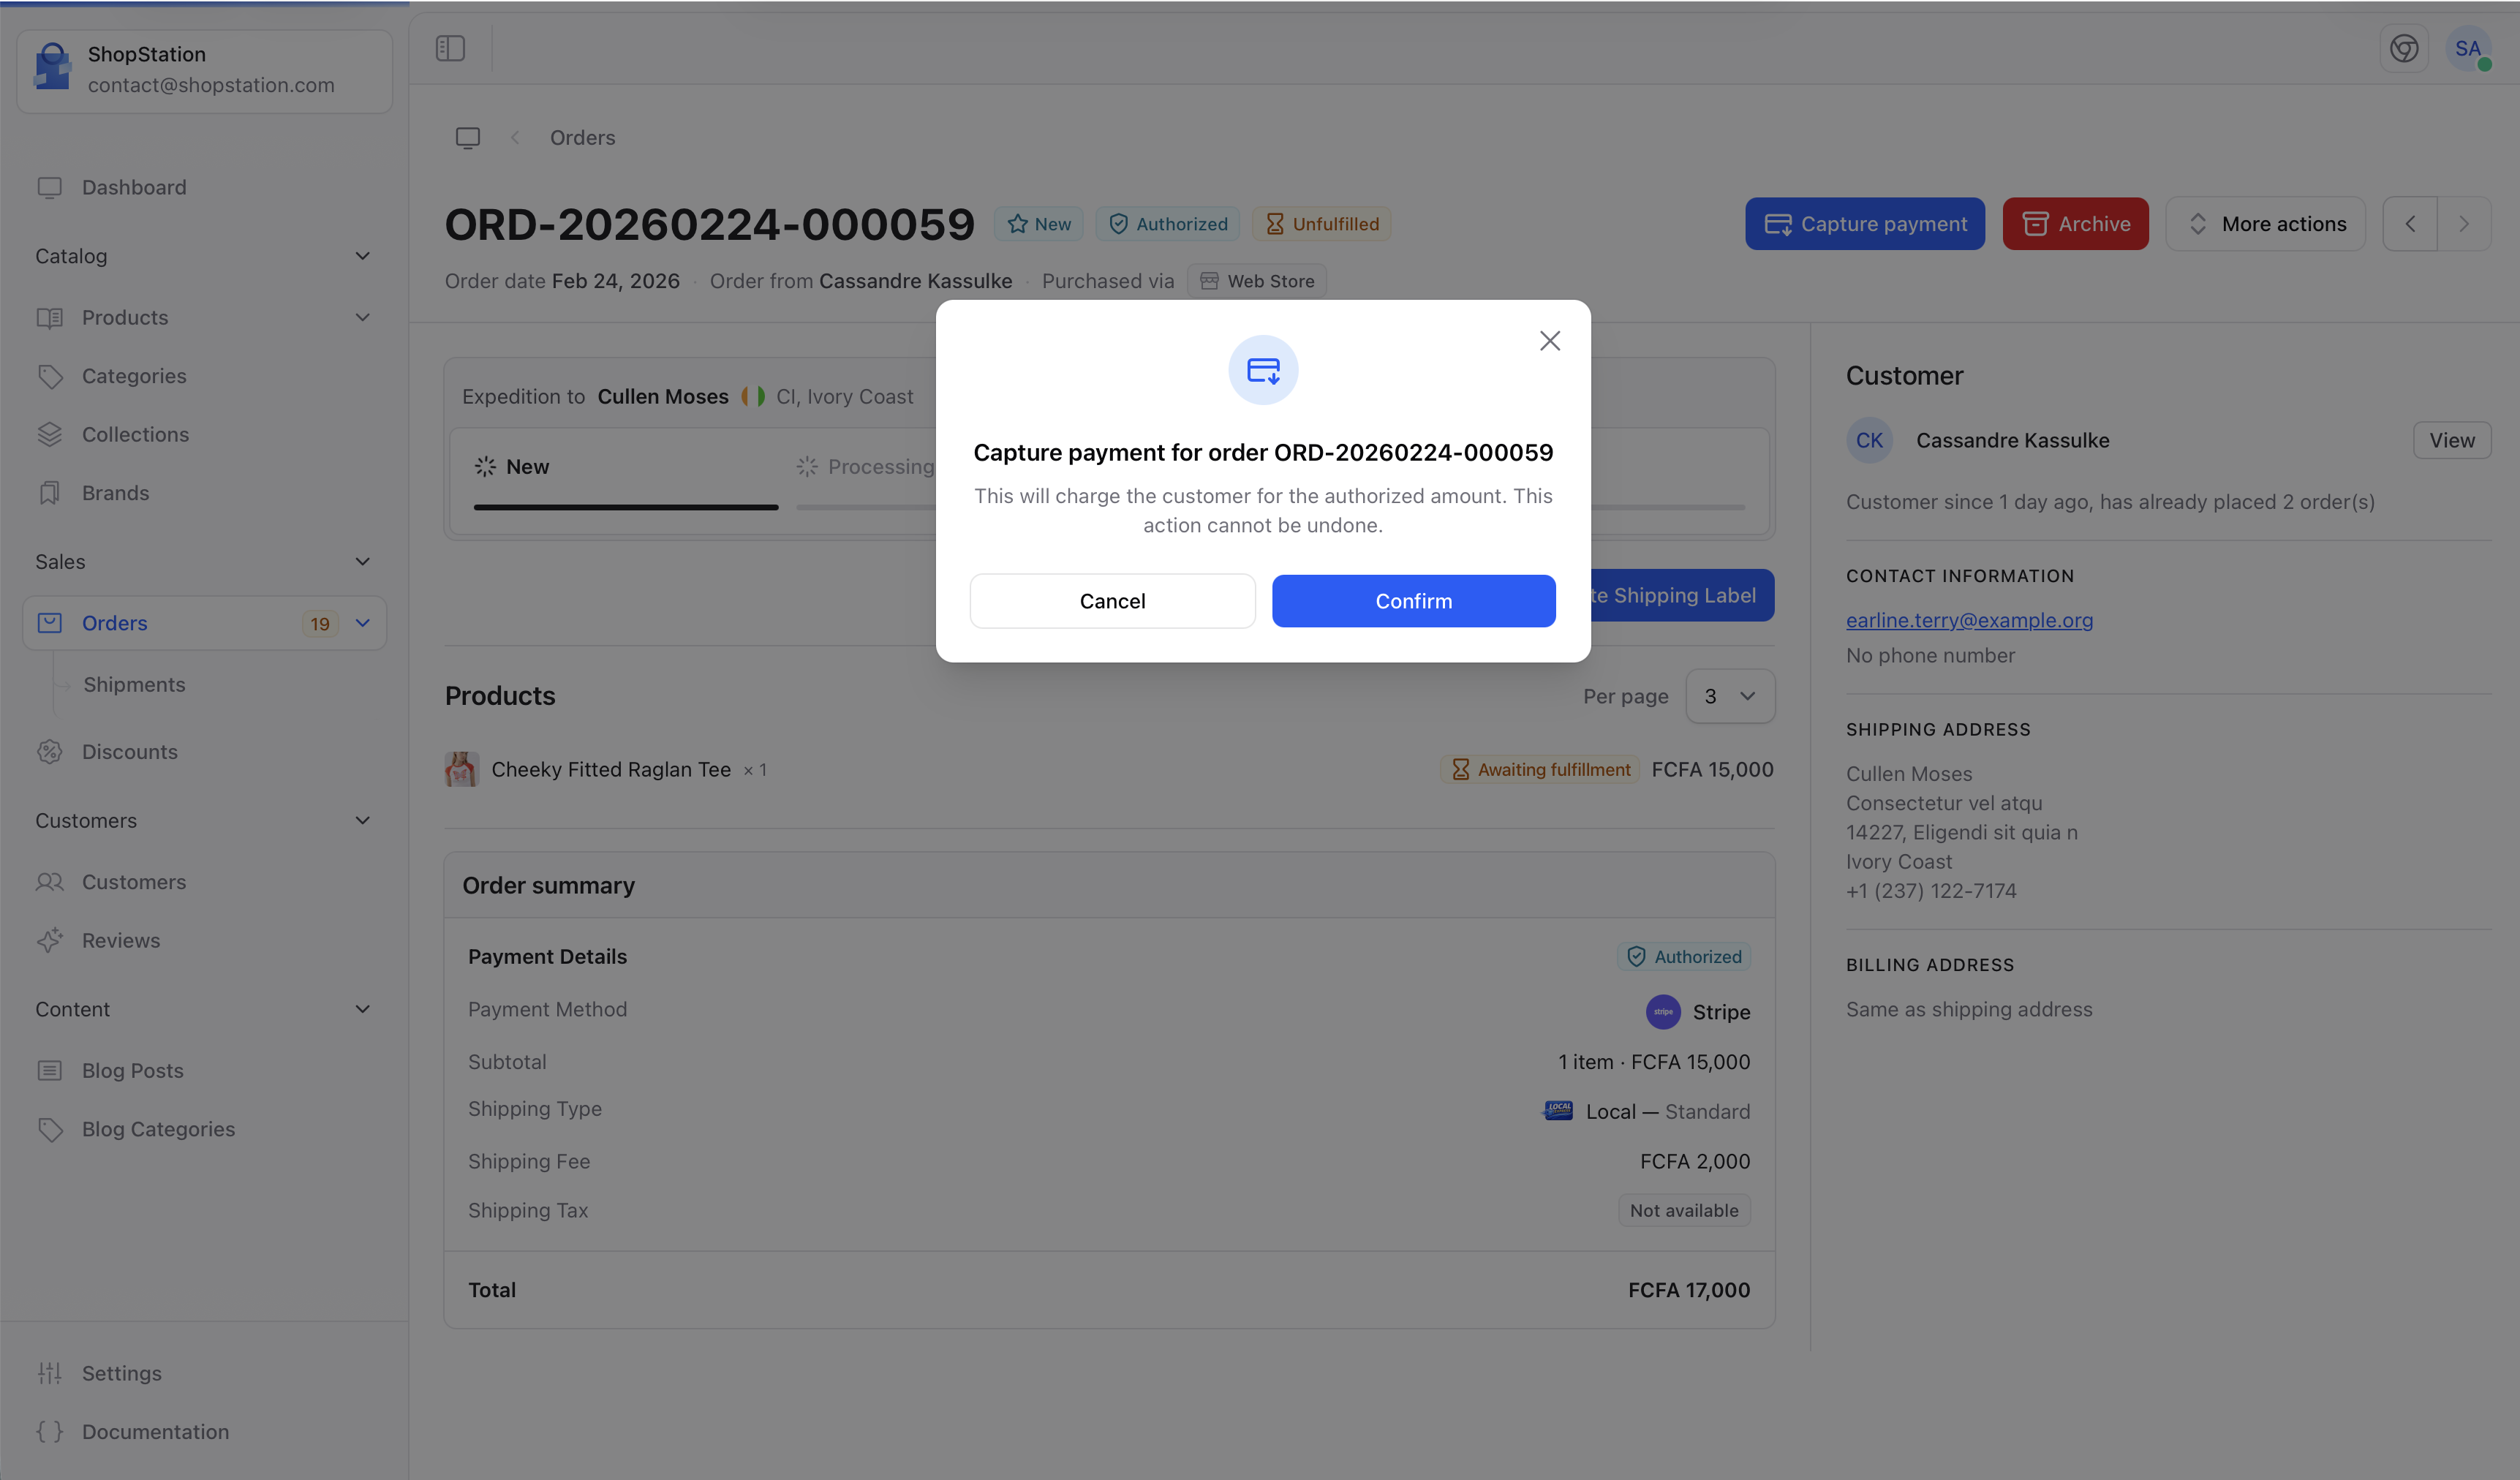 Appears when the payment status is **Authorized**. Clicking it charges the customer for the authorized amount. A confirmation dialog will appear since this action cannot be undone.
After capture, the payment status changes to **Paid** and the button disappears.
### Archive
Appears when the order is not completed and not paid. Moves the order to the Archived tab.
Archiving an order affects your revenue reports. Use this for orders that will never be fulfilled, like spam or test orders.
### More Actions
The dropdown contains context-sensitive actions:
| Action | When it appears | What it does |
| -------------------- | ----------------------------------------------- | ------------------------------------------------------------------------------------ |
| **Start processing** | Order is **New** | Changes order status to Processing and sets item fulfillment to Preparing |
| **Mark as paid** | Payment is **Pending** or **Authorized** | Changes payment status directly to Paid (without going through the payment provider) |
| **Mark complete** | Order is **Processing** and payment is **Paid** | Changes order status to Completed |
| **Cancel order** | Order can be cancelled | Cancels the order and records the cancellation date |
## Fulfillment
Fulfillment is the process of getting the ordered items to the customer. Shopper tracks this at two levels: the **order level** (shipping status) and the **item level** (fulfillment status per product).
### Creating a Shipment
When an order has items that haven't been shipped yet, the **Create Shipping Label** button appears in the fulfillment section.
Appears when the payment status is **Authorized**. Clicking it charges the customer for the authorized amount. A confirmation dialog will appear since this action cannot be undone.
After capture, the payment status changes to **Paid** and the button disappears.
### Archive
Appears when the order is not completed and not paid. Moves the order to the Archived tab.
Archiving an order affects your revenue reports. Use this for orders that will never be fulfilled, like spam or test orders.
### More Actions
The dropdown contains context-sensitive actions:
| Action | When it appears | What it does |
| -------------------- | ----------------------------------------------- | ------------------------------------------------------------------------------------ |
| **Start processing** | Order is **New** | Changes order status to Processing and sets item fulfillment to Preparing |
| **Mark as paid** | Payment is **Pending** or **Authorized** | Changes payment status directly to Paid (without going through the payment provider) |
| **Mark complete** | Order is **Processing** and payment is **Paid** | Changes order status to Completed |
| **Cancel order** | Order can be cancelled | Cancels the order and records the cancellation date |
## Fulfillment
Fulfillment is the process of getting the ordered items to the customer. Shopper tracks this at two levels: the **order level** (shipping status) and the **item level** (fulfillment status per product).
### Creating a Shipment
When an order has items that haven't been shipped yet, the **Create Shipping Label** button appears in the fulfillment section.
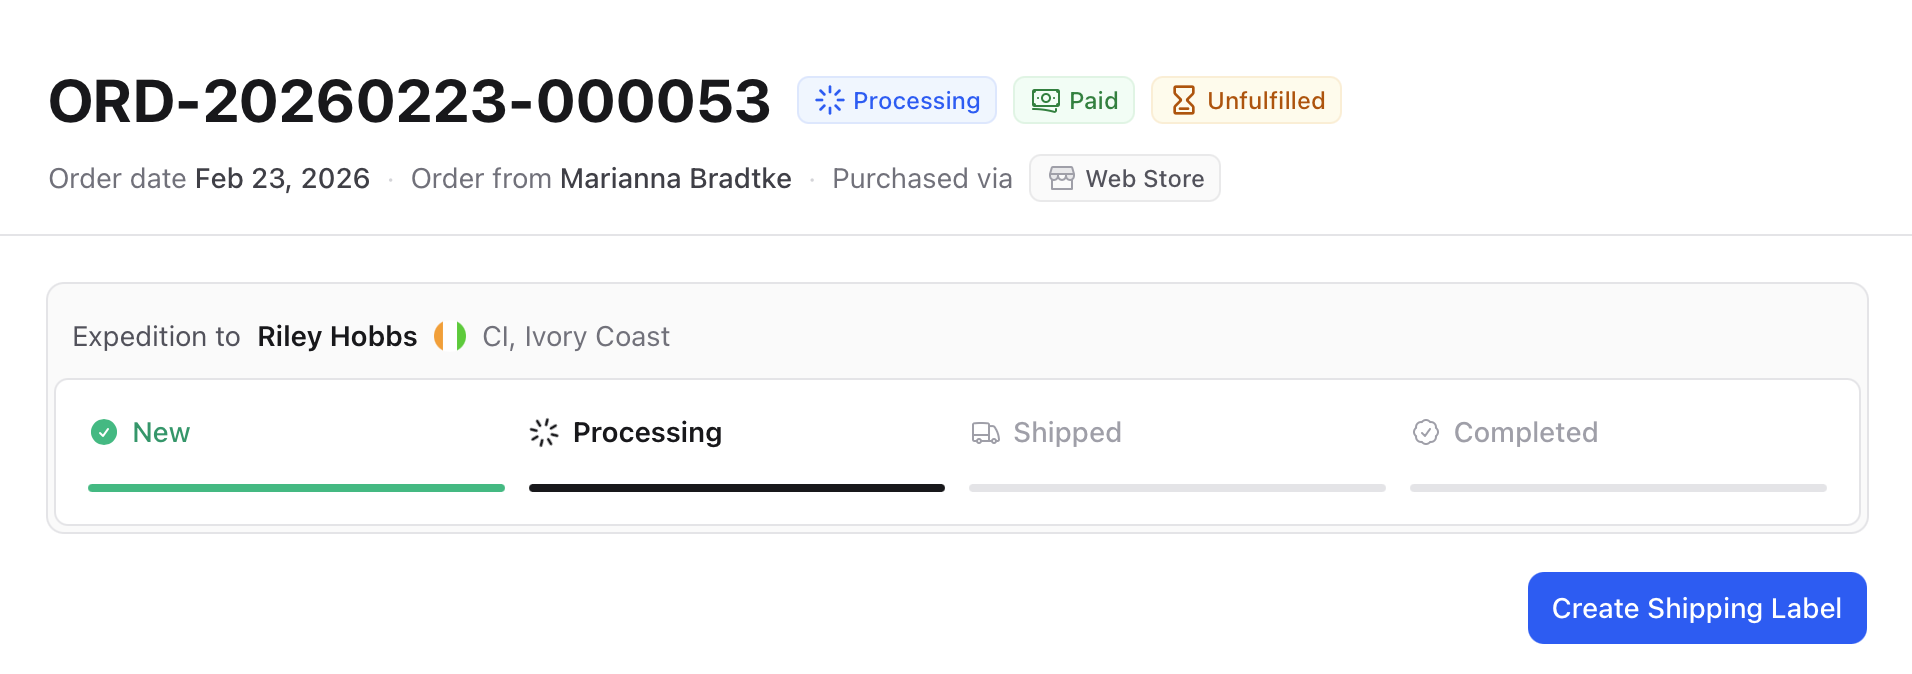 Clicking it opens a panel where you:
1. **Select a carrier**. Choose from your configured shipping carriers
2. **Add tracking info** (optional). Enter a tracking number and tracking URL
3. **Select items**. Pick which items to include in this shipment
Clicking it opens a panel where you:
1. **Select a carrier**. Choose from your configured shipping carriers
2. **Add tracking info** (optional). Enter a tracking number and tracking URL
3. **Select items**. Pick which items to include in this shipment
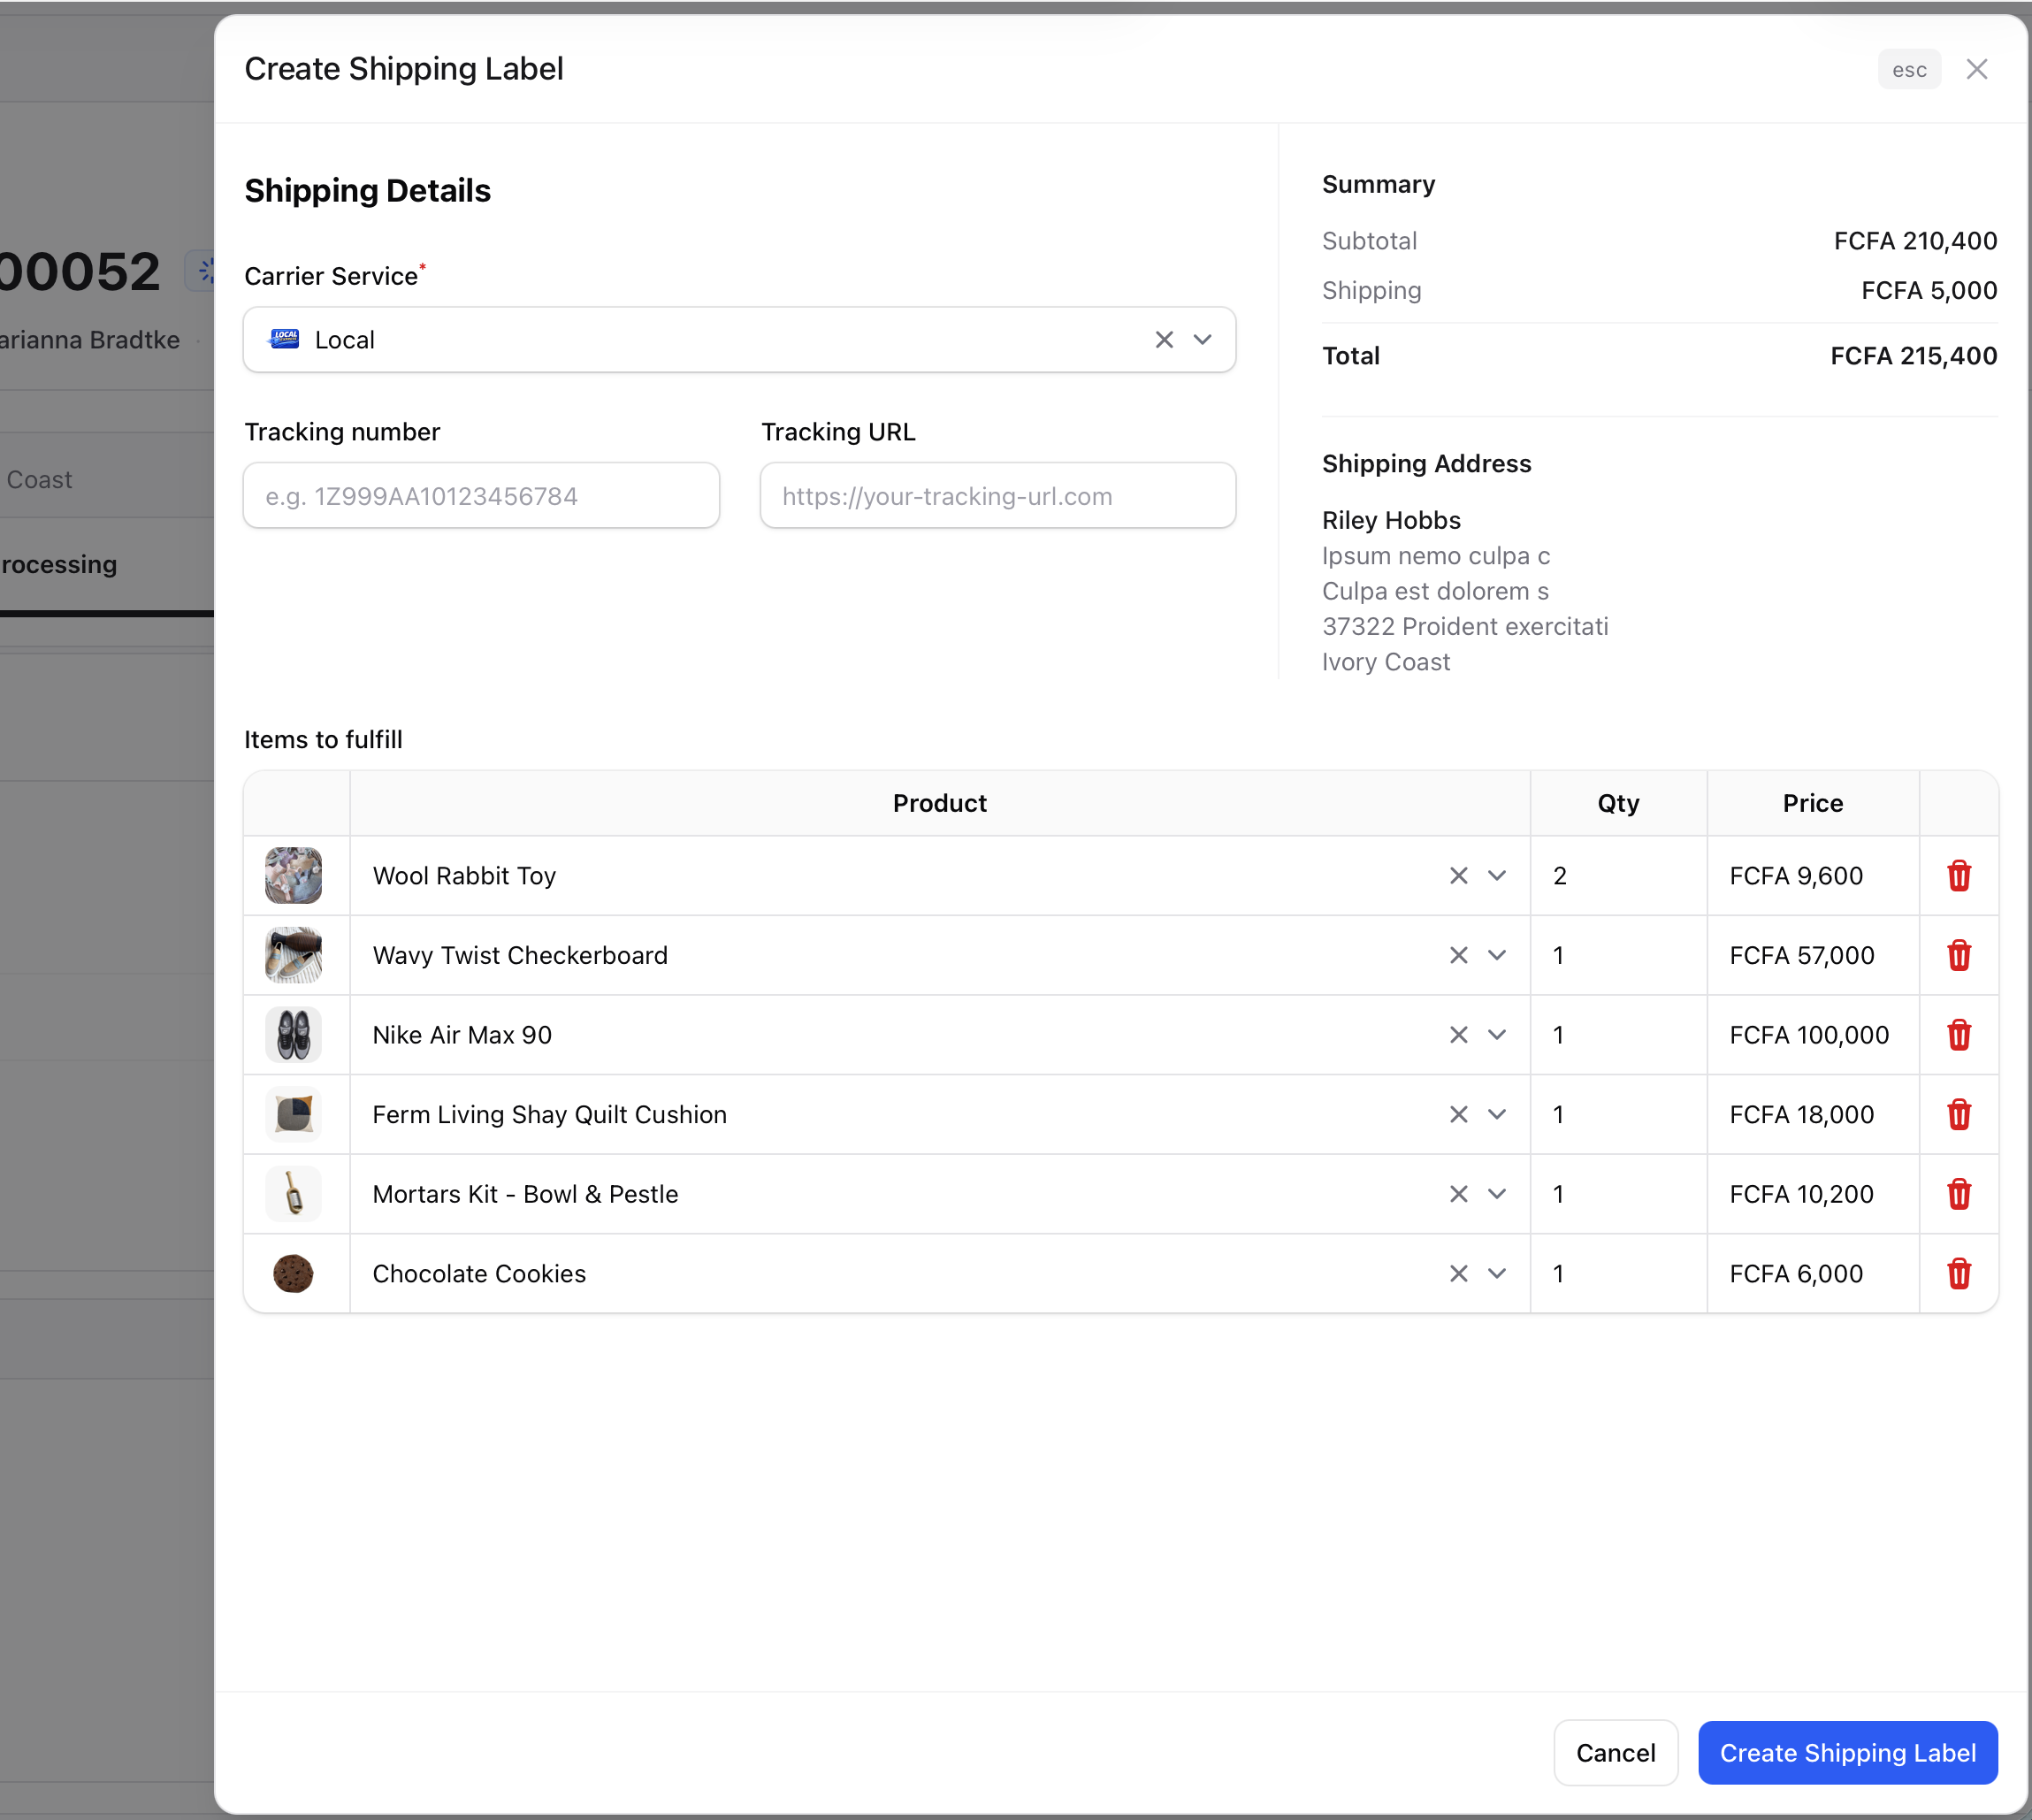 Once created, the shipment appears in the **Shipments** page and the selected items are marked as assigned.
### Partial Shipments
You don't have to ship everything at once. If an order has 5 items and only 3 are ready, create a shipment with those 3 items. The remaining 2 stay as unfulfilled and you can create a second shipment later.
The shipping status updates automatically:
* First shipment created → **Partially shipped**
* All items shipped → **Shipped**
* First package delivered → **Partially delivered**
* All packages delivered → **Delivered**
## Shipments
The **Shipments** page gives you a dedicated view of all shipments across your orders. Access it from the sidebar under Orders.
Once created, the shipment appears in the **Shipments** page and the selected items are marked as assigned.
### Partial Shipments
You don't have to ship everything at once. If an order has 5 items and only 3 are ready, create a shipment with those 3 items. The remaining 2 stay as unfulfilled and you can create a second shipment later.
The shipping status updates automatically:
* First shipment created → **Partially shipped**
* All items shipped → **Shipped**
* First package delivered → **Partially delivered**
* All packages delivered → **Delivered**
## Shipments
The **Shipments** page gives you a dedicated view of all shipments across your orders. Access it from the sidebar under Orders.
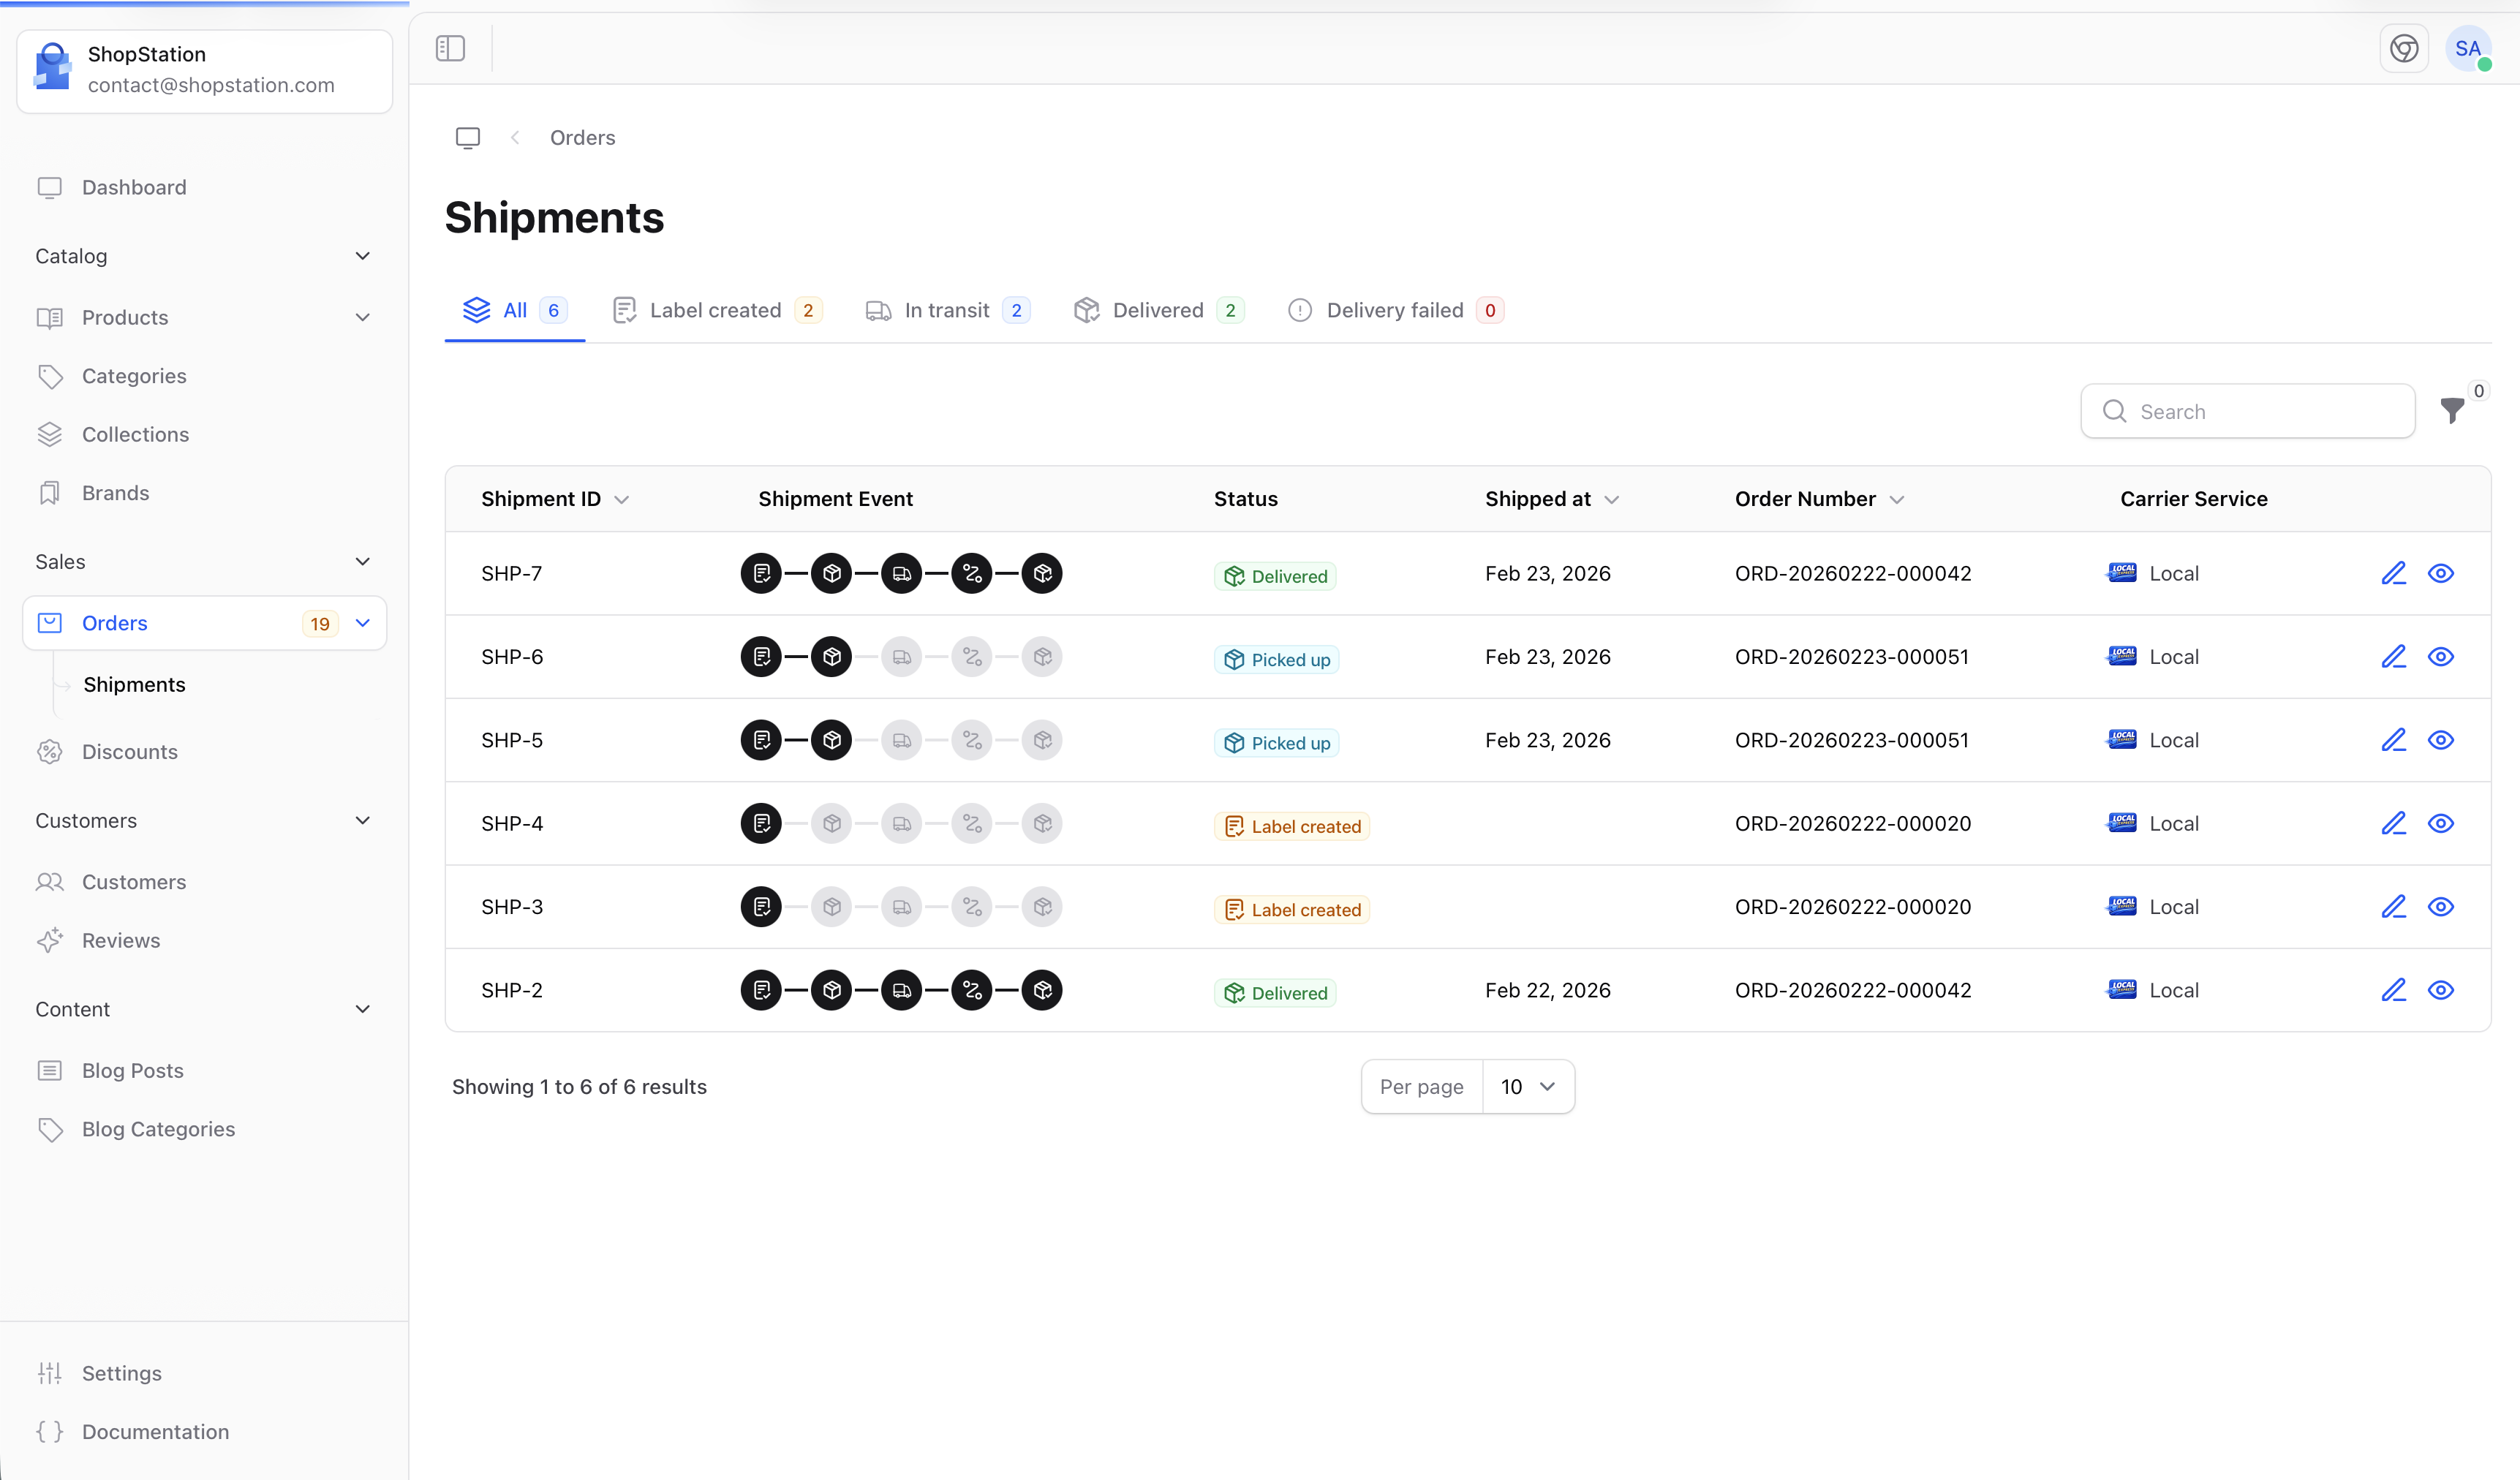 ### Tabs
| Tab | Shows |
| -------------- | ------------------------------------------------------- |
| **All** | Every shipment |
| **Pending** | Shipments with labels created but not yet picked up |
| **In Transit** | Shipments that have been picked up and are on their way |
| **Delivered** | Shipments that reached their destination |
| **Failed** | Shipments where delivery failed |
### Shipment Detail
Click the eye icon on any shipment to open its detail panel. This panel shows:
### Tabs
| Tab | Shows |
| -------------- | ------------------------------------------------------- |
| **All** | Every shipment |
| **Pending** | Shipments with labels created but not yet picked up |
| **In Transit** | Shipments that have been picked up and are on their way |
| **Delivered** | Shipments that reached their destination |
| **Failed** | Shipments where delivery failed |
### Shipment Detail
Click the eye icon on any shipment to open its detail panel. This panel shows:
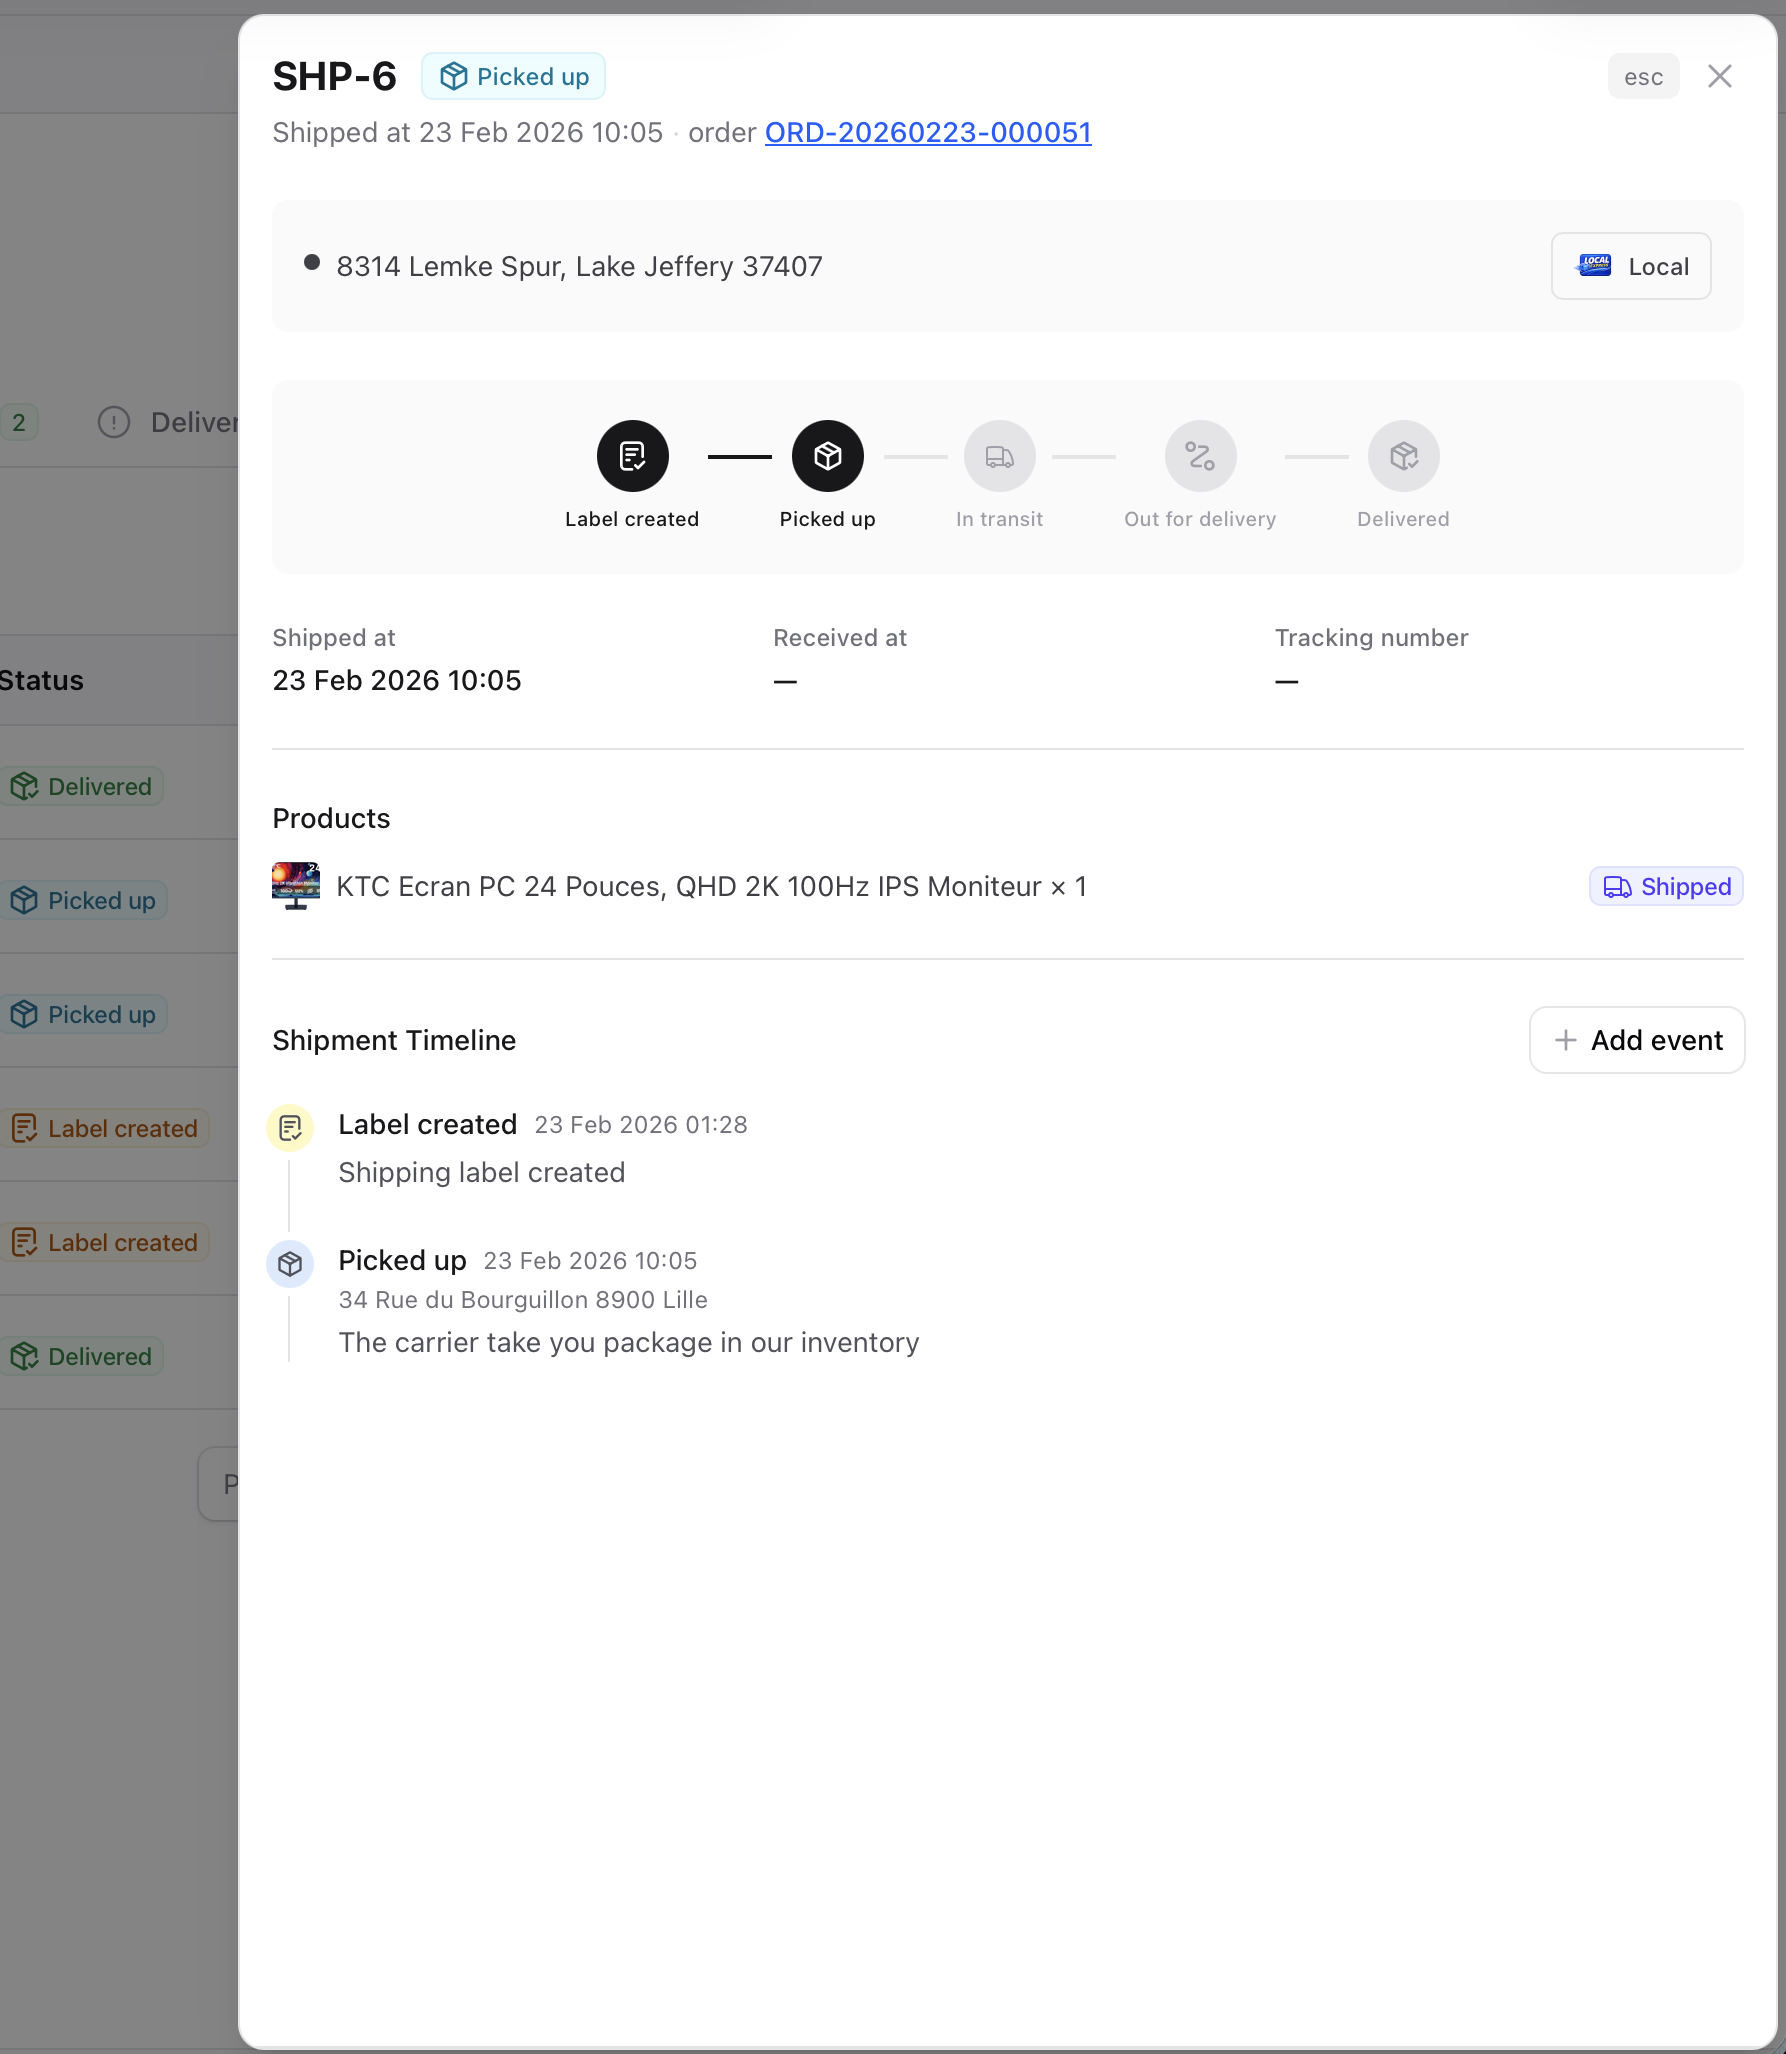 **Tracking progress**. A 5-step visual tracker:
Shipping label generated, waiting for carrier pickup.
Carrier has collected the package.
Package is on its way to the destination.
Package is with the local delivery driver.
Package has been delivered to the customer.
**Shipment details**. Shipped date, received date, and tracking number (linked to tracking URL if provided).
**Products**. The items included in this shipment with their fulfillment status.
**Timeline**. A chronological log of every event for this shipment. Each event records the status, date, location, and an optional description.
### Adding Tracking Events
Click **Add event** in the shipment detail panel to log a new tracking update. Select the status, set the date, and optionally add a location and description. This is useful when you receive updates from your carrier and want to keep the timeline accurate.
### Marking as Delivered
When a shipment arrives, click **Mark as delivered**. This updates the shipment status and all its items to Delivered. If this was the last pending shipment on the order, the order automatically moves to **Completed**.
## Typical Order Flow
Here's how a standard order moves through the system:
A customer completes checkout. The order appears as **New** with payment **Pending** and shipping **Unfulfilled**.
Depending on your payment method, the payment status changes to **Paid** (automatic capture) or **Authorized** (manual capture). If authorized, you capture it when ready.
Click **Start processing** to indicate you're preparing the order. Items move to **Preparing** status.
Click **Create Shipping Label**, select a carrier, add tracking info, and pick the items to ship. The shipping status updates to **Shipped** (or **Partially shipped** if not all items are included).
Add tracking events as the carrier provides updates. The shipment timeline shows the package's journey.
Mark the shipment as delivered. The order status automatically changes to **Completed**.
## Abandoned Carts
Sometimes customers add items to their cart but leave without completing checkout. Shopper tracks these as abandoned carts, giving you visibility into potential lost sales.
A cart is considered abandoned when it has items but no activity for a configurable period (default: 60 minutes).
### Viewing Abandoned Carts
To see abandoned carts:
1. Go to **Orders** in the sidebar
2. Click the **Abandoned Carts** tab
**Tracking progress**. A 5-step visual tracker:
Shipping label generated, waiting for carrier pickup.
Carrier has collected the package.
Package is on its way to the destination.
Package is with the local delivery driver.
Package has been delivered to the customer.
**Shipment details**. Shipped date, received date, and tracking number (linked to tracking URL if provided).
**Products**. The items included in this shipment with their fulfillment status.
**Timeline**. A chronological log of every event for this shipment. Each event records the status, date, location, and an optional description.
### Adding Tracking Events
Click **Add event** in the shipment detail panel to log a new tracking update. Select the status, set the date, and optionally add a location and description. This is useful when you receive updates from your carrier and want to keep the timeline accurate.
### Marking as Delivered
When a shipment arrives, click **Mark as delivered**. This updates the shipment status and all its items to Delivered. If this was the last pending shipment on the order, the order automatically moves to **Completed**.
## Typical Order Flow
Here's how a standard order moves through the system:
A customer completes checkout. The order appears as **New** with payment **Pending** and shipping **Unfulfilled**.
Depending on your payment method, the payment status changes to **Paid** (automatic capture) or **Authorized** (manual capture). If authorized, you capture it when ready.
Click **Start processing** to indicate you're preparing the order. Items move to **Preparing** status.
Click **Create Shipping Label**, select a carrier, add tracking info, and pick the items to ship. The shipping status updates to **Shipped** (or **Partially shipped** if not all items are included).
Add tracking events as the carrier provides updates. The shipment timeline shows the package's journey.
Mark the shipment as delivered. The order status automatically changes to **Completed**.
## Abandoned Carts
Sometimes customers add items to their cart but leave without completing checkout. Shopper tracks these as abandoned carts, giving you visibility into potential lost sales.
A cart is considered abandoned when it has items but no activity for a configurable period (default: 60 minutes).
### Viewing Abandoned Carts
To see abandoned carts:
1. Go to **Orders** in the sidebar
2. Click the **Abandoned Carts** tab
 The abandoned carts list shows each cart with the customer name (or "Guest" for anonymous shoppers), the number of items, the channel, and when the cart was last active.
### Cart Details
Click on any abandoned cart to view its contents. The detail panel shows the items the customer had in their cart and their contact information (if they were logged in).
The abandoned carts list shows each cart with the customer name (or "Guest" for anonymous shoppers), the number of items, the channel, and when the cart was last active.
### Cart Details
Click on any abandoned cart to view its contents. The detail panel shows the items the customer had in their cart and their contact information (if they were logged in).
 ### What You Can Learn
Abandoned carts help you understand:
* **Which products are being abandoned** to identify pricing or UX issues
* **At what stage customers leave** to improve your checkout flow
* **Whether logged-in customers abandon more than guests** to target recovery efforts
Look for patterns in abandoned carts. If many customers abandon carts with the same product, the price may be too high or the shipping cost may be surprising at checkout.
### Automatic Cleanup
Abandoned carts older than 30 days are automatically cleaned up to keep your database lean. This threshold is configurable by your developer in the [Cart configuration](/v2/cart#pruning).
For developer details on querying abandoned carts and building recovery email flows, see the [Cart documentation](/v2/cart#abandoned-carts).
For developer details, see the [Orders documentation](/v2/orders).
### What You Can Learn
Abandoned carts help you understand:
* **Which products are being abandoned** to identify pricing or UX issues
* **At what stage customers leave** to improve your checkout flow
* **Whether logged-in customers abandon more than guests** to target recovery efforts
Look for patterns in abandoned carts. If many customers abandon carts with the same product, the price may be too high or the shipping cost may be surprising at checkout.
### Automatic Cleanup
Abandoned carts older than 30 days are automatically cleaned up to keep your database lean. This threshold is configurable by your developer in the [Cart configuration](/v2/cart#pruning).
For developer details on querying abandoned carts and building recovery email flows, see the [Cart documentation](/v2/cart#abandoned-carts).
For developer details, see the [Orders documentation](/v2/orders).