> ## Documentation Index
> Fetch the complete documentation index at: https://docs.laravelshopper.dev/llms.txt
> Use this file to discover all available pages before exploring further.
# Legal
> Manage legal pages like privacy policy, terms of service, and shipping policies
As with any e-commerce site, it is important for users to know the terms and conditions and privacy policy that your site offers. This is for their own safety and yours as well.
This section allows you to set up your pages for your privacy policy, return policy, terms of use and shipping policy to be presented to customers.
## Model
The model used is `Shopper\Core\Models\Legal`. It uses the `HasSlug` trait for automatic slug generation.
### Database Schema
| Column | Type | Nullable | Default | Description |
| ------------ | --------- | -------- | ------- | ------------------------------------ |
| `id` | bigint | no | auto | Primary key |
| `title` | string | no | - | Legal page title (unique) |
| `slug` | string | no | auto | URL-friendly identifier (unique) |
| `content` | longtext | yes | null | Legal page content (rich text) |
| `is_enabled` | boolean | no | false | Whether this legal page is published |
| `created_at` | timestamp | yes | null | Creation timestamp |
| `updated_at` | timestamp | yes | null | Last update timestamp |
## Components
The components used to manage Legal page are found in the component configuration file `config/shopper/components/setting.php`. Each component corresponds to the page that is defined
```php theme={null}
use Shopper\Livewire;
return [
'pages' => [
// ...
'settings.legal.privacy' => Components\Settings\Legal\Privacy::class,
'settings.legal.refund' => Components\Settings\Legal\Refund::class,
'settings.legal.shipping' => Components\Settings\Legal\Shipping::class,
'settings.legal.terms' => Components\Settings\Legal\Terms::class,
// ...
];
];
```
## Add Legal content
In your administration area you must click on the "cog" icon to display the settings page of your store.
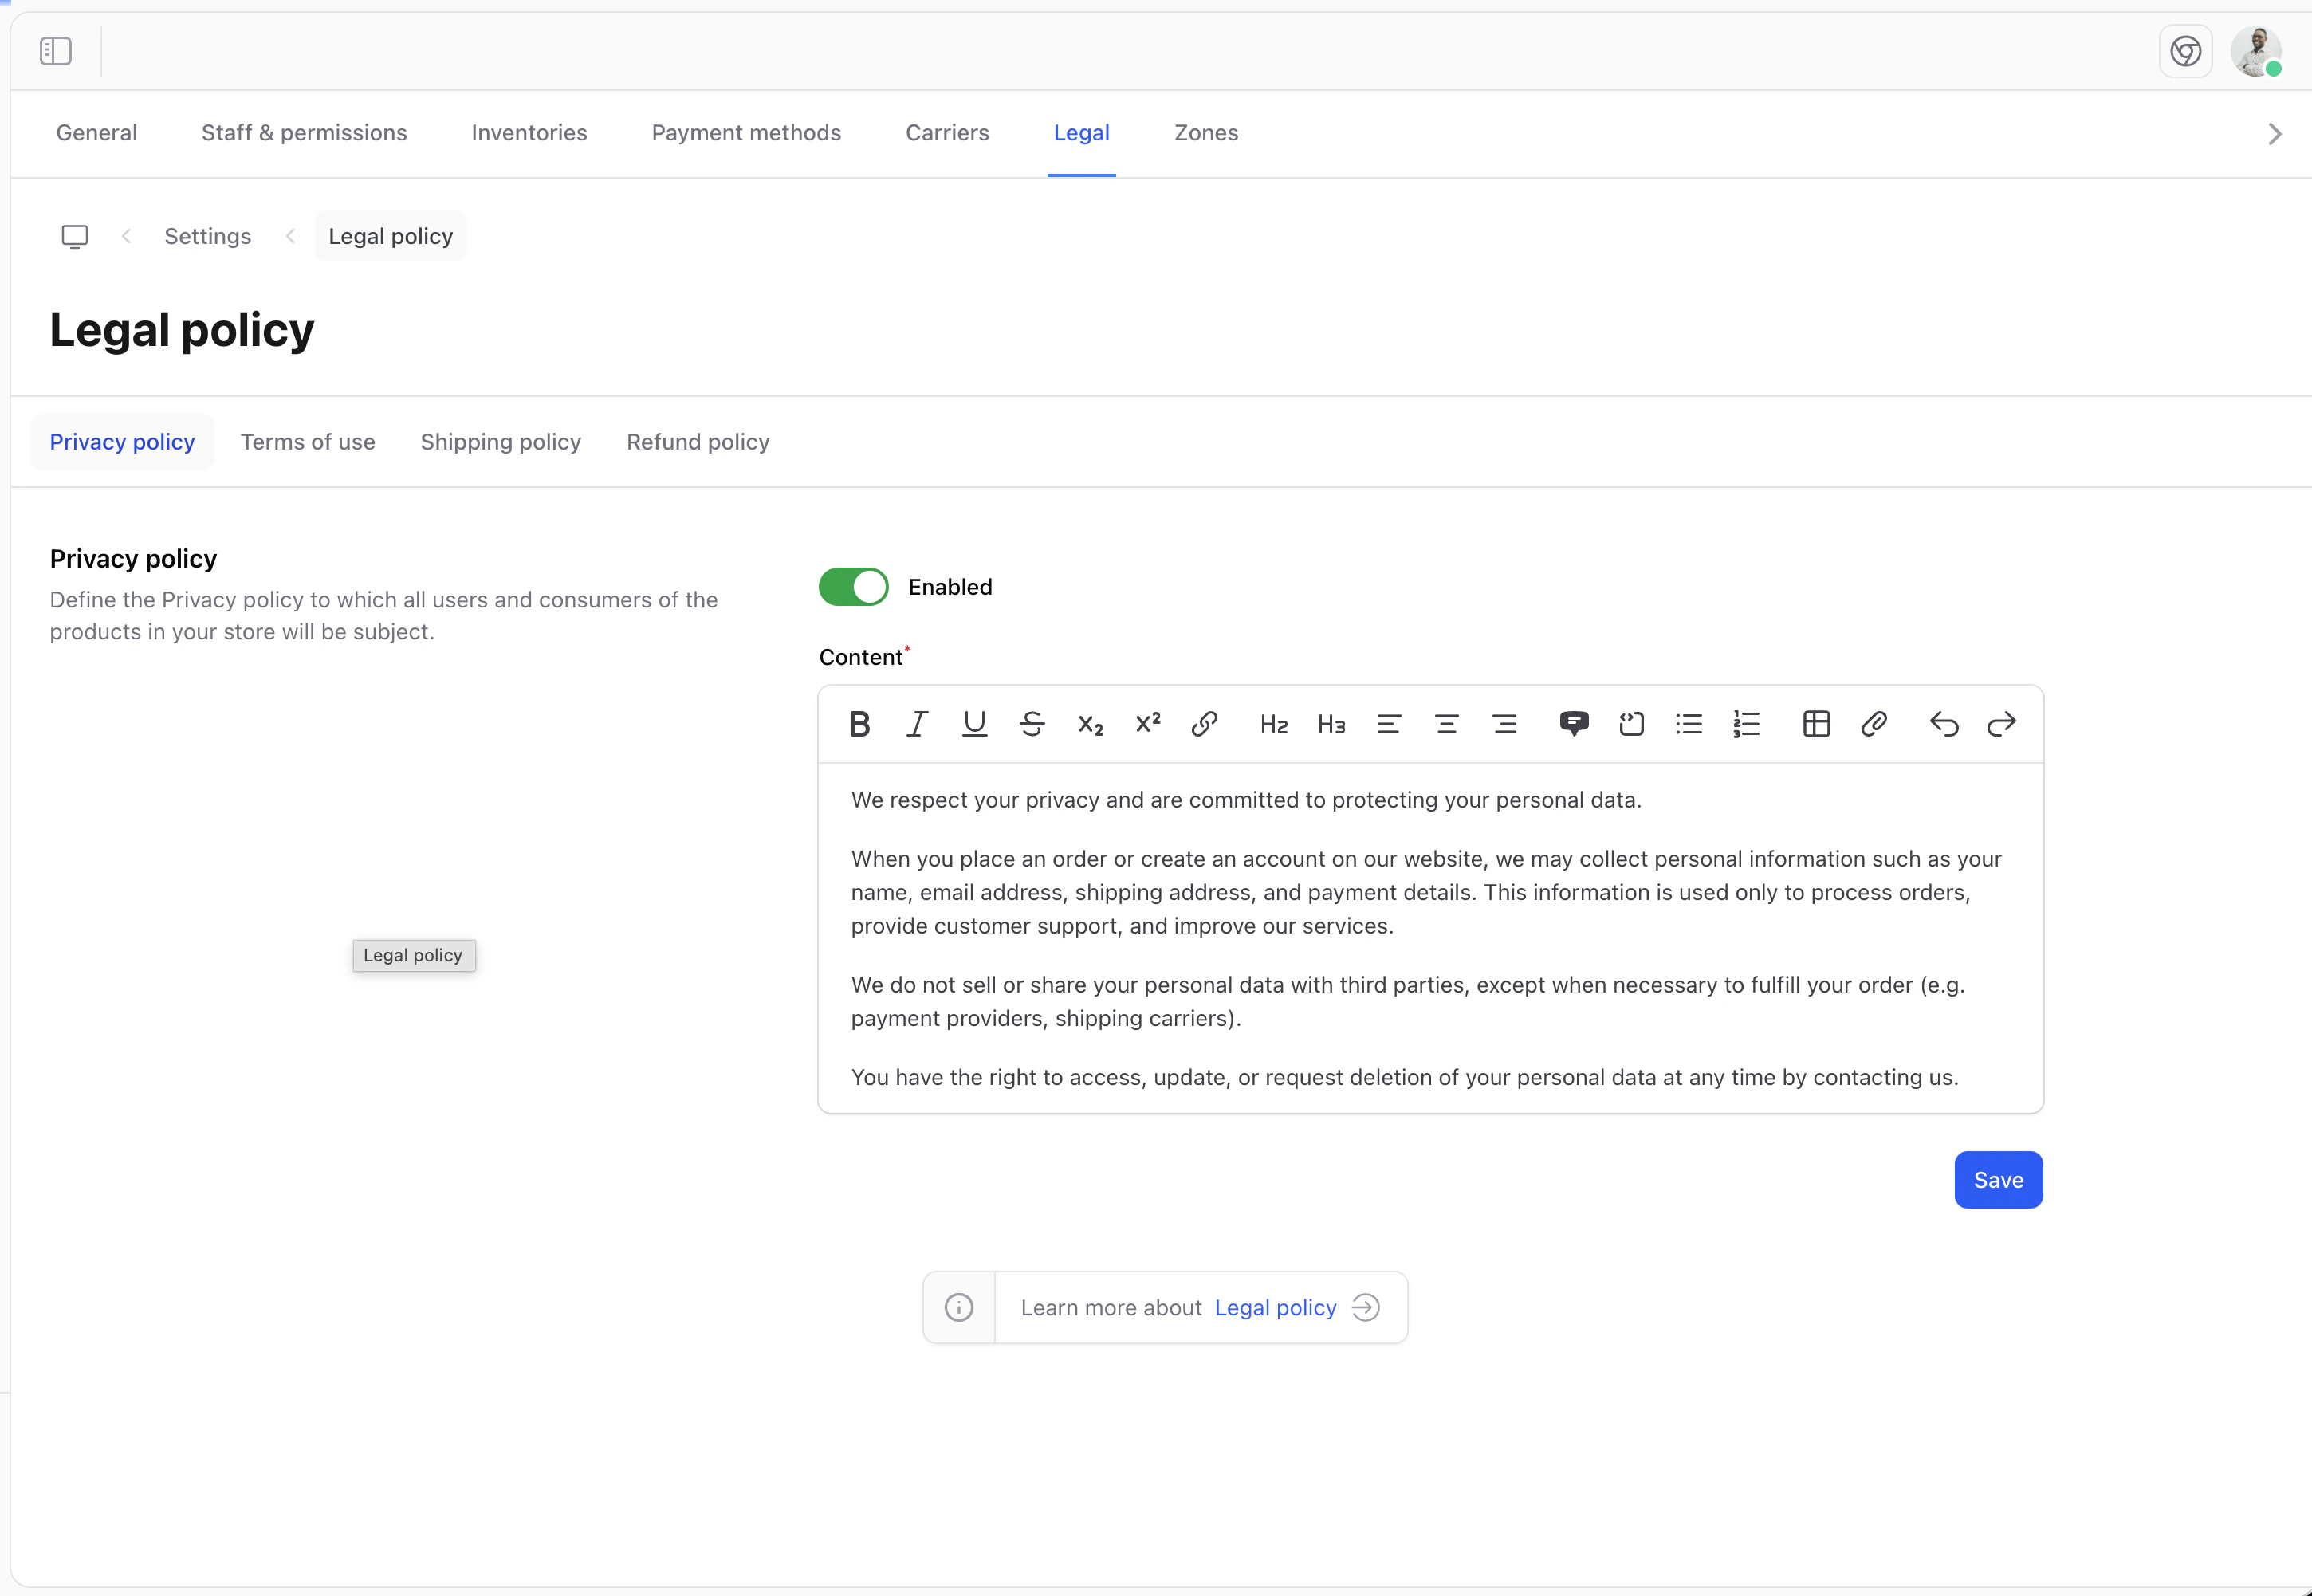
From your admin panel, on the blue sidebar click on the cog icon, go to `Settings > Legal`.
Once in this page, all the legal pages are displayed as a tab. You can just fill in the content of each page and click on the Enable switch to retrieve the content of your page and display it in your front-end.
 Shopper does not generate the routes for the legal pages, you should set them up yourself. As mentioned in the introduction of this documentation, the **Framework** is just an e-commerce administration
## Retrieve Data
Once the information is filled in, we can display it to our users in the views we have created.
To do this we will start by creating a controller that will take care of collecting our information and send it to a view
```bash theme={null}
php artisan make:controller LegalController
```
We will add the functions for each of our pages and return the information to present them to our users. Our controller will look like this
```php theme={null}
namespace App\Http\Controllers;
use Shopper\Core\Models\Legal;
class LegalController extends Controller
{
public function privacy()
{
return view('legal.privacy', [
'legal' => Legal::enabled()->where('slug', 'privacy')->first(),
]);
}
public function refund()
{
return view('legal.refund', [
'legal' => Legal::enabled()->where('slug', 'refund')->first(),
]);
}
public function terms()
{
return view('legal.terms', [
'legal' => Legal::enabled()->where('slug', 'terms')->first(),
]);
}
public function shipping()
{
return view('legal.shipping', [
'legal' => Legal::enabled()->where('slug', 'shipping')->first(),
]);
}
}
```
`Legal::enabled()` is a scope that filters legal pages where `is_enabled` is `true`. This ensures draft pages are not shown to customers.
### Routes
Once we have created the controllers we will associate the routes that will allow us to display our contents. We will display our content in the `web.php`.
```php theme={null}
use App\Http\Controllers\LegalController;
/*
* Legal routes
*/
Route::get('/privacy', [LegalController::class, 'privacy'])->name('legal.privacy');
Route::get('/terms-of-use', [LegalController::class, 'terms'])->name('legal.terms');
Route::get('/refund-policy', [LegalController::class, 'refund'])->name('legal.refund');
Route::get('/shipping', [LegalController::class, 'shipping'])->name('legal.shipping');
```
### Views
You can create views in this way to arrange the content of your legal pages.
```files theme={null}
resources/views/legal/
privacy.blade.php
terms.blade.php
refund.blade.php
shipping.blade.php
```
It's just an idea of how to make your views, not a recommendation. If your front-end is in react, vue or svelte you will not necessarily have the same architecture. So keep in mind that it's just to display your content.
Example of a view
```blade theme={null}
@extends('layouts.app')
@section('body')
Shopper does not generate the routes for the legal pages, you should set them up yourself. As mentioned in the introduction of this documentation, the **Framework** is just an e-commerce administration
## Retrieve Data
Once the information is filled in, we can display it to our users in the views we have created.
To do this we will start by creating a controller that will take care of collecting our information and send it to a view
```bash theme={null}
php artisan make:controller LegalController
```
We will add the functions for each of our pages and return the information to present them to our users. Our controller will look like this
```php theme={null}
namespace App\Http\Controllers;
use Shopper\Core\Models\Legal;
class LegalController extends Controller
{
public function privacy()
{
return view('legal.privacy', [
'legal' => Legal::enabled()->where('slug', 'privacy')->first(),
]);
}
public function refund()
{
return view('legal.refund', [
'legal' => Legal::enabled()->where('slug', 'refund')->first(),
]);
}
public function terms()
{
return view('legal.terms', [
'legal' => Legal::enabled()->where('slug', 'terms')->first(),
]);
}
public function shipping()
{
return view('legal.shipping', [
'legal' => Legal::enabled()->where('slug', 'shipping')->first(),
]);
}
}
```
`Legal::enabled()` is a scope that filters legal pages where `is_enabled` is `true`. This ensures draft pages are not shown to customers.
### Routes
Once we have created the controllers we will associate the routes that will allow us to display our contents. We will display our content in the `web.php`.
```php theme={null}
use App\Http\Controllers\LegalController;
/*
* Legal routes
*/
Route::get('/privacy', [LegalController::class, 'privacy'])->name('legal.privacy');
Route::get('/terms-of-use', [LegalController::class, 'terms'])->name('legal.terms');
Route::get('/refund-policy', [LegalController::class, 'refund'])->name('legal.refund');
Route::get('/shipping', [LegalController::class, 'shipping'])->name('legal.shipping');
```
### Views
You can create views in this way to arrange the content of your legal pages.
```files theme={null}
resources/views/legal/
privacy.blade.php
terms.blade.php
refund.blade.php
shipping.blade.php
```
It's just an idea of how to make your views, not a recommendation. If your front-end is in react, vue or svelte you will not necessarily have the same architecture. So keep in mind that it's just to display your content.
Example of a view
```blade theme={null}
@extends('layouts.app')
@section('body')
{{ __('Privacy Policy') }}
{{ __('Last update: :date', ['date' => $legal->created_at->format('d, F Y')]) }}
{!! $legal->content !!}
@endsection
```