> ## Documentation Index
> Fetch the complete documentation index at: https://docs.laravelshopper.dev/llms.txt
> Use this file to discover all available pages before exploring further.
# Dashboard
> Overview of the admin dashboard components, caching, access requirements, and customization options.
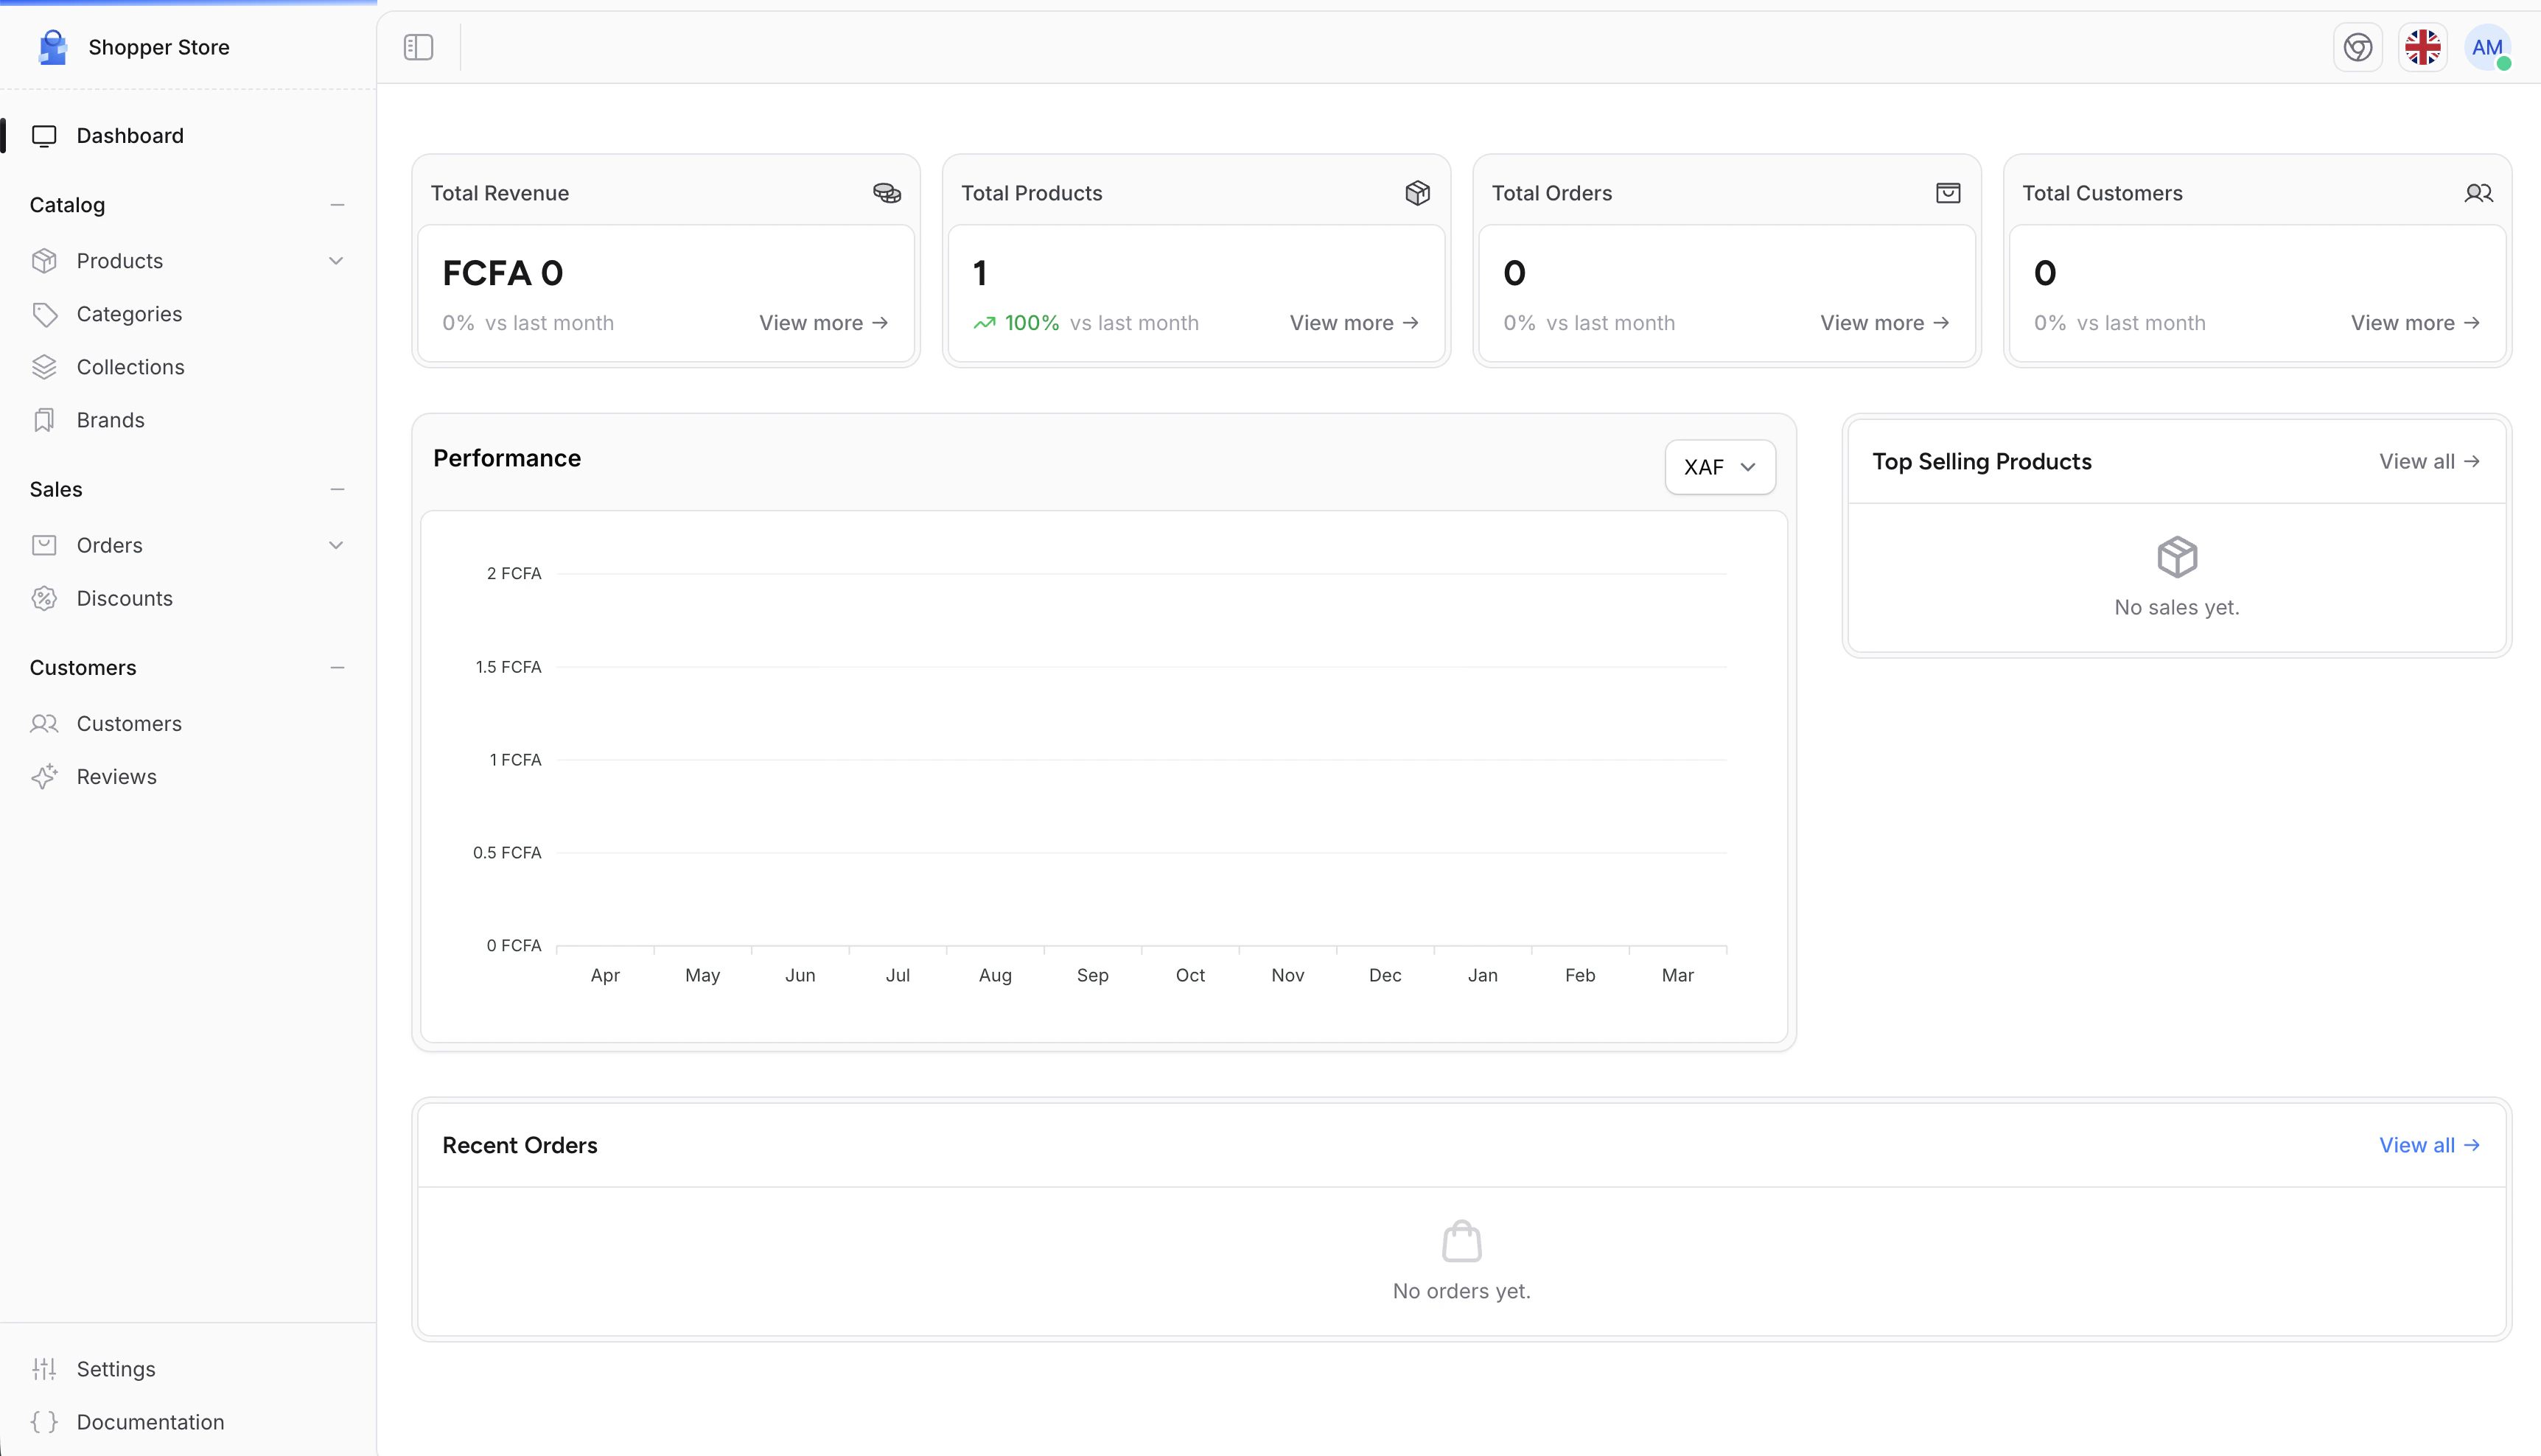
The dashboard is the first screen after login. It shows store health at a glance: revenue trends, key metrics, recent orders, top products, and an onboarding guide that auto-dismisses once the store is configured.
 ## Components
The dashboard is composed of five Livewire components, each with independent caching and a focused responsibility.
### RevenueChart
Displays monthly revenue as a bar chart for the last 12 months. Data is grouped by month in a single aggregated query and cached with flexible TTL (fresh for 5 minutes, stale up to 30 minutes).
The chart supports a currency filter. When you have multiple active currencies, a dropdown lets you switch between them. The Y-axis and tooltip are formatted using `Intl.NumberFormat` with the store's locale and currency symbol.
The revenue query supports MySQL, PostgreSQL, and SQLite with database-specific date expressions.
### StatCards
Shows four summary cards comparing the current month to the previous month:
| Card | Metric | Scope |
| --------- | ------------------------------------------------------------------------- | ---------------- |
| Revenue | Sum of `price_amount` on paid orders | Current currency |
| Products | Total product count, monthly new products for trend | All types |
| Orders | Count of paid orders, monthly count for trend | All currencies |
| Customers | Count of users with the `customer` scope, monthly new customers for trend | All |
Each card shows the percentage change versus the previous month, with a green or red trend indicator. Cards link to their respective admin sections.
### RecentOrders
A table of the 7 most recent orders, excluding orders with Cancelled or Archived status. Each row shows the order number, first product with thumbnail, total amount, payment status badge, and links to the order detail page.
### TopSellingProducts
Ranks the top 6 products by total quantity sold across paid orders. Variant sales are aggregated back to the parent product. Each row shows the product thumbnail, name, total units sold, and average review score.
### SetupGuide
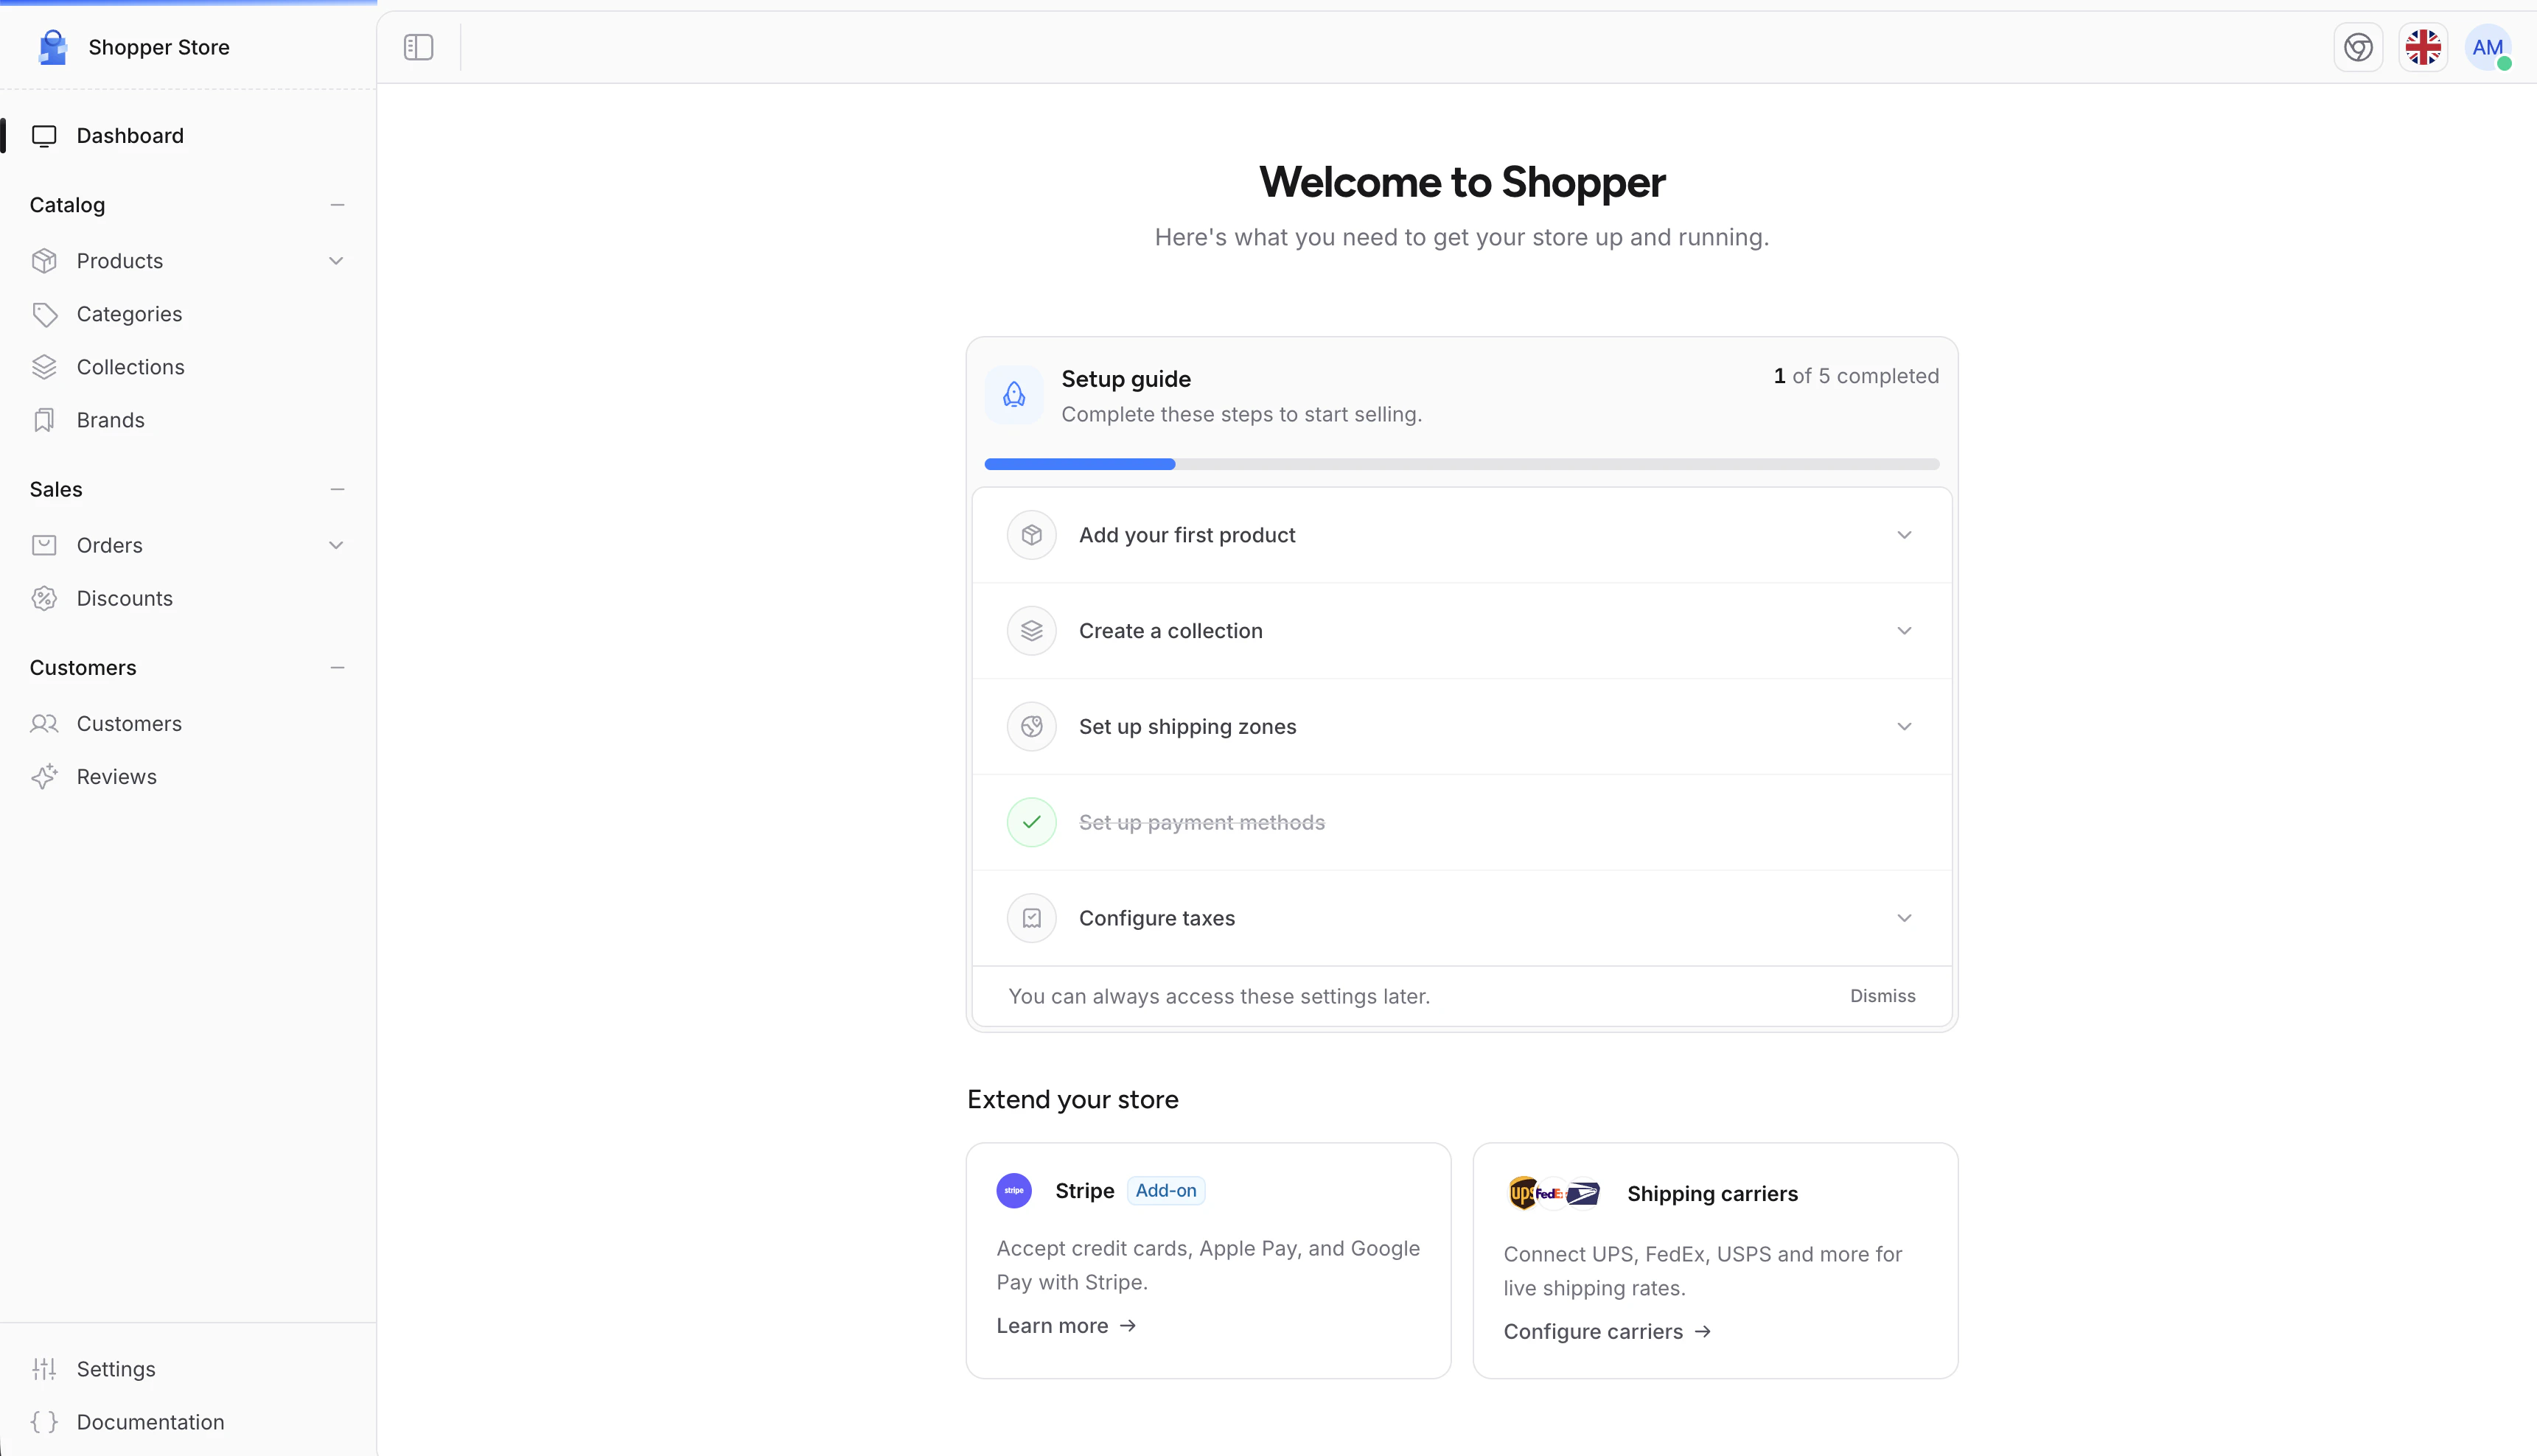
An interactive checklist that guides new stores through the essential configuration steps. It appears on first login and auto-detects completion by querying the database:
## Components
The dashboard is composed of five Livewire components, each with independent caching and a focused responsibility.
### RevenueChart
Displays monthly revenue as a bar chart for the last 12 months. Data is grouped by month in a single aggregated query and cached with flexible TTL (fresh for 5 minutes, stale up to 30 minutes).
The chart supports a currency filter. When you have multiple active currencies, a dropdown lets you switch between them. The Y-axis and tooltip are formatted using `Intl.NumberFormat` with the store's locale and currency symbol.
The revenue query supports MySQL, PostgreSQL, and SQLite with database-specific date expressions.
### StatCards
Shows four summary cards comparing the current month to the previous month:
| Card | Metric | Scope |
| --------- | ------------------------------------------------------------------------- | ---------------- |
| Revenue | Sum of `price_amount` on paid orders | Current currency |
| Products | Total product count, monthly new products for trend | All types |
| Orders | Count of paid orders, monthly count for trend | All currencies |
| Customers | Count of users with the `customer` scope, monthly new customers for trend | All |
Each card shows the percentage change versus the previous month, with a green or red trend indicator. Cards link to their respective admin sections.
### RecentOrders
A table of the 7 most recent orders, excluding orders with Cancelled or Archived status. Each row shows the order number, first product with thumbnail, total amount, payment status badge, and links to the order detail page.
### TopSellingProducts
Ranks the top 6 products by total quantity sold across paid orders. Variant sales are aggregated back to the parent product. Each row shows the product thumbnail, name, total units sold, and average review score.
### SetupGuide
An interactive checklist that guides new stores through the essential configuration steps. It appears on first login and auto-detects completion by querying the database:
 | Step | Completed when | Permission |
| ---------------------- | ------------------------------------------ | ----------------- |
| Add a product | At least one product exists | `add_products` |
| Create a collection | At least one collection exists | `add_collections` |
| Set up shipping zones | At least one enabled shipping zone exists | `access_setting` |
| Set up payment methods | At least one enabled payment method exists | `access_setting` |
| Configure taxes | At least one tax zone exists | `access_setting` |
When all steps are marked complete, the guide saves a `setup_guide_done` setting and dispatches a `setup-guide-completed` event to hide itself. It does not reappear on subsequent visits. The guide can also be dismissed early with the dismiss button.
## Caching
Each dashboard component caches its data independently. The cache keys and TTLs are:
| Component | Cache key | Fresh TTL | Stale TTL |
| ------------------ | -------------------------------- | --------- | --------- |
| RevenueChart | `dashboard:revenue:{currency}` | 5 min | 30 min |
| StatCards | `dashboard:stat-cards:{locale}` | 5 min | 30 min |
| RecentOrders | `dashboard:recent-orders` | 1 min | 5 min |
| TopSellingProducts | `dashboard:top-selling-products` | 5 min | 30 min |
To clear the dashboard cache manually (for example after a data import), flush the keys:
```php theme={null}
use Illuminate\Support\Facades\Cache;
Cache::forget('dashboard:revenue:USD');
Cache::forget('dashboard:stat-cards:en');
Cache::forget('dashboard:recent-orders');
Cache::forget('dashboard:top-selling-products');
```
## Access Requirements
The dashboard middleware checks two conditions before rendering the page. The user must be an admin or have the `access_dashboard` permission. The store must have the `email` and `street_address` settings configured (these are set during the initial store setup).
If the settings are missing, the middleware redirects to the store initialization page. If the user lacks permission, a 403 response is returned.
## Customizing the Dashboard
### Replacing the Entire Page
The dashboard page is registered in the components configuration. Publish the dashboard component config to swap it with your own implementation:
```bash theme={null}
php artisan shopper:component:publish dashboard
```
This creates `config/shopper/components/dashboard.php`:
```php theme={null}
use Shopper\Livewire\Components;
use Shopper\Livewire\Pages;
return [
'pages' => [
'dashboard' => Pages\Dashboard::class,
],
'components' => [
'locale-switcher' => Components\LocaleSwitcher::class,
],
];
```
Replace the page class with your own component:
```php theme={null}
'pages' => [
'dashboard' => App\Livewire\Pages\Dashboard::class,
],
```
Your component only needs to render a view with the app layout. The simplest override:
```php theme={null}
namespace App\Livewire\Pages;
use Illuminate\Contracts\View\View;
use Livewire\Component;
final class Dashboard extends Component
{
public function render(): View
{
return view('dashboard.index')
->layout('shopper::components.layouts.app', [
'title' => 'Dashboard',
]);
}
}
```
### Overriding Individual Components
If you want to replace a single widget (for example, swap the revenue chart for a custom report), publish the dashboard Blade view and edit it directly.
First, publish Shopper's views:
```bash theme={null}
php artisan vendor:publish --tag=shopper-views
```
Then open `resources/views/vendor/shopper/livewire/pages/dashboard.blade.php`. The view renders each component via Livewire tags that you can replace:
```blade theme={null}
```
Replace any tag with your own Livewire component or plain Blade content.
## Adding Content via Render Hooks
If you only want to inject content above or below the dashboard without replacing the page or publishing views, use the layout render hooks:
```php theme={null}
use Shopper\Facades\Shopper;
use Shopper\View\LayoutRenderHook;
Shopper::renderHook(
LayoutRenderHook::DASHBOARD_START,
fn (): string => view('dashboard.store-alert-banner')->render(),
);
Shopper::renderHook(
LayoutRenderHook::DASHBOARD_END,
fn (): string => view('dashboard.custom-reports')->render(),
);
```
Register these hooks in a service provider's `boot` method. See the [Render Hooks](/v2/render-hooks) documentation for the full list of available injection points.
| Step | Completed when | Permission |
| ---------------------- | ------------------------------------------ | ----------------- |
| Add a product | At least one product exists | `add_products` |
| Create a collection | At least one collection exists | `add_collections` |
| Set up shipping zones | At least one enabled shipping zone exists | `access_setting` |
| Set up payment methods | At least one enabled payment method exists | `access_setting` |
| Configure taxes | At least one tax zone exists | `access_setting` |
When all steps are marked complete, the guide saves a `setup_guide_done` setting and dispatches a `setup-guide-completed` event to hide itself. It does not reappear on subsequent visits. The guide can also be dismissed early with the dismiss button.
## Caching
Each dashboard component caches its data independently. The cache keys and TTLs are:
| Component | Cache key | Fresh TTL | Stale TTL |
| ------------------ | -------------------------------- | --------- | --------- |
| RevenueChart | `dashboard:revenue:{currency}` | 5 min | 30 min |
| StatCards | `dashboard:stat-cards:{locale}` | 5 min | 30 min |
| RecentOrders | `dashboard:recent-orders` | 1 min | 5 min |
| TopSellingProducts | `dashboard:top-selling-products` | 5 min | 30 min |
To clear the dashboard cache manually (for example after a data import), flush the keys:
```php theme={null}
use Illuminate\Support\Facades\Cache;
Cache::forget('dashboard:revenue:USD');
Cache::forget('dashboard:stat-cards:en');
Cache::forget('dashboard:recent-orders');
Cache::forget('dashboard:top-selling-products');
```
## Access Requirements
The dashboard middleware checks two conditions before rendering the page. The user must be an admin or have the `access_dashboard` permission. The store must have the `email` and `street_address` settings configured (these are set during the initial store setup).
If the settings are missing, the middleware redirects to the store initialization page. If the user lacks permission, a 403 response is returned.
## Customizing the Dashboard
### Replacing the Entire Page
The dashboard page is registered in the components configuration. Publish the dashboard component config to swap it with your own implementation:
```bash theme={null}
php artisan shopper:component:publish dashboard
```
This creates `config/shopper/components/dashboard.php`:
```php theme={null}
use Shopper\Livewire\Components;
use Shopper\Livewire\Pages;
return [
'pages' => [
'dashboard' => Pages\Dashboard::class,
],
'components' => [
'locale-switcher' => Components\LocaleSwitcher::class,
],
];
```
Replace the page class with your own component:
```php theme={null}
'pages' => [
'dashboard' => App\Livewire\Pages\Dashboard::class,
],
```
Your component only needs to render a view with the app layout. The simplest override:
```php theme={null}
namespace App\Livewire\Pages;
use Illuminate\Contracts\View\View;
use Livewire\Component;
final class Dashboard extends Component
{
public function render(): View
{
return view('dashboard.index')
->layout('shopper::components.layouts.app', [
'title' => 'Dashboard',
]);
}
}
```
### Overriding Individual Components
If you want to replace a single widget (for example, swap the revenue chart for a custom report), publish the dashboard Blade view and edit it directly.
First, publish Shopper's views:
```bash theme={null}
php artisan vendor:publish --tag=shopper-views
```
Then open `resources/views/vendor/shopper/livewire/pages/dashboard.blade.php`. The view renders each component via Livewire tags that you can replace:
```blade theme={null}
```
Replace any tag with your own Livewire component or plain Blade content.
## Adding Content via Render Hooks
If you only want to inject content above or below the dashboard without replacing the page or publishing views, use the layout render hooks:
```php theme={null}
use Shopper\Facades\Shopper;
use Shopper\View\LayoutRenderHook;
Shopper::renderHook(
LayoutRenderHook::DASHBOARD_START,
fn (): string => view('dashboard.store-alert-banner')->render(),
);
Shopper::renderHook(
LayoutRenderHook::DASHBOARD_END,
fn (): string => view('dashboard.custom-reports')->render(),
);
```
Register these hooks in a service provider's `boot` method. See the [Render Hooks](/v2/render-hooks) documentation for the full list of available injection points.